1AJ31125.png

4 Amazing Post-Processing Effects for Unique Nature & Landscape Photos (VIDEO)

We frequently stress the importance of experimenting with new tools and techniques, because that’s the only way to expand your skills and broaden your portfolio. This quick tutorial with pro Austin James Jackson, is designed to do exactly that by demonstrating four interesting Photoshop effects that anyone can apply to their outdoor images in minutes.

Jackson is an up-and-coming star based in Southern Utah who’s always searching for a new and innovative approach to our craft. He posts weekly shooting and editing tutorials that will quickly elevate your game—whether you’re a young pup like him or an old dog like many of us.

Setting aside the primary goal of this episode, it serves another valuable purpose as well; namely, when you’re short on inspiration, open an image in Photoshop, and simply have np idea where to begin. In either case, you’ll definitely get a big jolt of creativity in the next 18 minutes. Jackson put’s it like this: “If you’re struggling to find ways to enhance an image, this is the perfect video—even if you have a good Photoshop workflow. So add these four tricks to your Photoshop  toolbelt.”

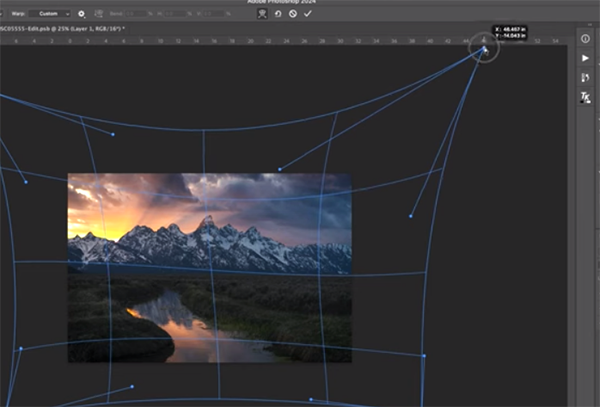
He begins by explaining when, why, and how to Warp an image. The sample photo looks awesome at is, but Jackson has a few reasons for employing an easy Warp effect. One is a distracting curved horizon that can’t be effectively fixed with the Crop tool. The other is that “I want the distant mountains to appear more grand.”

Jackson also wants to create more interest to the stream than runs all the way from the foreground to the background. He demonstrates how easy it is to accomplish all three goals with a bit of Warp-tool magic. Once you get the hang of it, and it doesn’t take long, you’ll think of other ways to make use of this method.

Next on the list is a technique for creating custom vignettes that can really draw attention to a key element in certain types of outdoor images. This one requires a few more steps, and Jackson walks you through exactly how they work. There’s also a link beneath the video to a more comprehensive lesson on this specific topic.

At this point you’re only halfway through the episode and there are two more interesting effects to learn, and these are just as easy and transformational as those mentioned above. Trust us: by watching until the end your creative juices will be flowing once again.

Then head over to Jackson’s instructional YouTube channel where there are many more easy-to-learn techniques that will make your images rise above the crowd.

We also recommend watching an earlier tutorial we featured with another acoomplished pro who demonstrates a straightforward Lightroom technique that will transform a dull photo into a masterpiece in barely four minutes.

1aCM31125.png

Basic B&W Workflow for Photos That Look Boring in Color (VIDEO)

All of us who shoot in color have experienced the disappointment of capturing a unique scene that fails to meet expectations. The video below from the PHLOG Photography YouTube channel explains why some images can be significantly more compelling in b&w, with a basic workflow for making a dramatic transformation.

Instructor Christian Mohrle is one the most inspirational landscape photographers in Germany. He’s also a post-processing expert who’s very generous about sharing editing tips that contribute to his success. Be sure to download today’s sample Raw file with a link beneath the video so you can follow along and make the changes yourself as they’re explained.

Mohrle’s original image was captured against an overcast sky and there’s a strange color cast in the center of the subject. Rather than struggle to make a silk purse out of sow’s ear, he recommends this: “By turning this shot into a b&w image we can emphasize the lights and shadows of the scene and make the subject stand out in a very pleasing way.”

As always, Mohrle begins in Lightroom’s Basic panel and makes several global adjustments to prepare his image for the targeted enhancements that follow. After clicking on the B&W button below the histogram, Mohrle drops exposure until details are barely perceptible in the darkest parts of the image. He also drops highlights, bumps up whites to enhance contrast, and boosts Texture, Clarity and Dehaze to sharpen things up.

Mohrle also demonstrates the versatility of Lightroom’s White Balance settings when editing monochrome images, with modifications to color temperature that create specific effects. Now that he has the best-possible base image it’s time for local enhancement with straightforward masking techniques that balance out tones and add punch for an attention-grabbing look.

He chooses the Select Background option in Lightroom’s masking panel and takes advantage of the subject’s definitive lines to create precise separation. Mohrle then walks you through the remaining steps that significantly darken the background and further accentuate his main subject. He wants to maintain light coming in from the left and this is quickly accomplished with a Radial Gradient.

All that remains for Mohrle’s impressive b&w transformation is a bit more color grading and some very careful sharpening. All the proof you need can be discovered with a quick glance at his before/after images.

Mohrle’s popular YouTube channel is a great source of instructional videos, especially if landscape photography is your thing.

We also recommend watching the recent tutorial we featured with another accomplished pro who provides a quick refresher on exposure basics and demonstrates the best way to capture detail in photographs of unusually dark subjects.