1S31725.png

Simple Secrets for Stunning High-Key Bird Photos (VIDEO)

Bird photography is both fun and accessible because it’s a genre that anyone than pursue at a nearby park, wildlife refuge, or even in the comfort of their own backyard. Even newbies can get in on the action with dynamic results, as you’ll see in this quick tutorial from the popular Flying Parrot instructional YouTube channel.

Today’s Australian instructor Sonia is a commercial photographer turned wildlife chaser who refers to herself as a “bird tourist.” She’s also a very adept educator whose how-to videos are designed to share creative techniques that quickly inspire confidence in nature shooters of all skill levels.

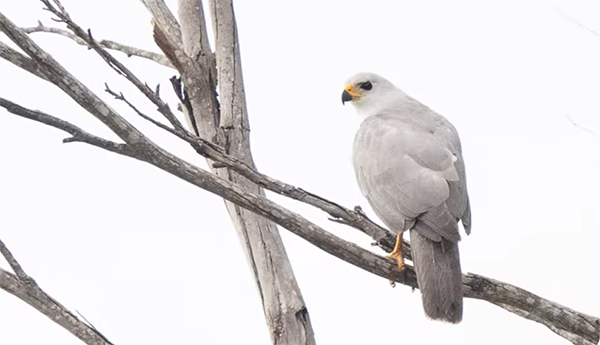
This tutorial reveals several straightforward secrets for capturing stunning high-key images of our feathered friends. This interesting approach works its magic to produced bright images with little or no shadows for a clean, minimalist effect. It’s not only effective for wildlife imagery, but for portraiture, product photography, fashion imagery, and more.

The trick is to emphasize lighter details with intentional overexposure to minimize distractions and create photos with a dazzling effect. White backgrounds like overcast skies help get the job done by drawing attention to birds within the frame. Thoughtful composition and interesting camera angles go a long way toward fulfilling these goals  with whatever equipment you own.

Sonia says she’s particularly fond of this oft-ignored technique because of the unique illustrative quality it can bring to bird photography. As she says, “it’s quite easy to create these high key images. All you need are the right conditions, a little bit of adjustments to your settings, and some straightforward post processing to finish it off.”

She explains everything you need to know in the next six minutes, beginning with the optimum conditions. You’re looking for a dull, overcast day with soft and diffused light that’s “as even and gentle as possible.” Interestingly, this is exactly the type of situation that many of us dread for most types of photography in the field. The next important element is a pale background which is typically the sky, but you can also use sand, water, or even a white building or light-colored trees.

Sona explains the camera settings she recommends for purposefully over-exposing the image in a way that blows out the sky while retaining accurate color and detail in the subject’s feathers. This can be accomplished by employing Exposure Compensation to add one-three stops depending upon the situation at hand.

She demonstrates her editing approach with Lightroom, but just about any post-processing software will work fine. You’ll learn how to eliminate noise and improve images that are still too dark for this particular effect. “The first two steps are trimming back highlights, and then increasing shadows to balance out the light.

There’s much more great advice on the Flying Parrot Photography YouTube channel, especially for inexperienced bird photographers who want to take their skills to the next level.

We also recommend watching a tutorial we featured recently with another outdoor photography expert who explains when and why you should ignore a common rule that often results in predictably uninspired landscape and nature photographs.

1M31725.png

Embellish Landscape Photos with Perfect In-Camera Sunstars (VIDEO)

All outdoor photographers look for a creative edge that make their images stand out from the crowd, especially when shooting iconic sites that have been photographed time and time again. Today’s quick tutorial from the KPM YouTube channel demonstrates how to do exactly that by including a perfectly defined sunstar that adds drama and depth when framing up a shot.          

Perhaps this technique is unfamiliar, or maybe you’ve tried it in the past and your sunstars appeared weak and unimpressive. In either case, all that’s going to change in the next four minutes. Here’s how Instructor Madhaven summarizes this episode: “I break down the art of photographing sunstars—those radiant bursts of light that can transform an ordinary scene into something extraordinary.”

Madhaven is a notable adventurer and landscape photographer whose storytelling skills play a big part in the impact of his inspirational imagery. The location for this behind-the-scenes lesson is the beautiful Alabama Hills in California’s Eastern Sierra mountains. Madhaven’s specific target is the iconic Mobius Arch at sunset where he walks you a simple step-by-step process for creating a clean and more pronounced sunstar.

If you already tried and failed it boils down to this: “Capturing a spectacular sunstar is about much more than pointing your camera and hoping for the best; rather, it’s about control. In other words,, control of camera settings, control of composition, and control over the way light interacts with a scene.” Once you understand these necessary considerations you’ll be well equipped for success.

Careful planning is also super important, and Madhaven works things out so that his arrival coincides with the sun setting inside his subject. Even more impressive is that Mount Whitney, the tallest peak in the lower 48, appears in the background above his sunstar within the arch. A great example how it’s possible to create your own luck.

Madhaven is shooting at the short end of a 24-70mm wide-angle zoom and he explains his choice like this: “the wider your focal length, the sharper and more defined a sunstar will be.” He suggests setting the camera to ISO 100 with an aperture of f/20 to minimize noise and further accentuate the sunstar.

While many photographers understand why stopping down is the best way to go, Madhaven demonstrates this less familiar trick: “If you position the sun on the edge of a solid object, whether it’s a mountain, building (or in this case the arch), the sunstar effect will be intensified.”

Madhaven provides a few more helpful in-camera tips, then he concludes the episode by explaining a “pro level” two-image blending technique that retains maximum detail in both the sun and the foreground of a scene. You can find more helpful shooting and editing advice by paying a visit to the KPM Photography YouTube channel.

Speaking of eye-catching photographs, don’t miss a recent tutorial we featured with another experienced shooter pro who demonstrates how he use backlighting to capture gorgeous landscape, nature, and wildlife photographs that are impossible to ignore.