1AN41725.png

This New AI-Powered ACR Remove Reflections Tool is a Gamechanger! (VIDEO)

The task of removing image-killing reflections, like in photos shot with a window within the frame, used to be a somewhat arduous chore. But fortunately those complications are now a thing of the past thanks to the powerful new AI-powered Remove Reflections tool in Adobe Camera Raw (ACR).

This timesaving explainer comes to us from the folks at PHLEARN, a popular YouTube channel that founder Aaron Nace describes as “the number one Photoshop and Lightroom online resource.” Be sure to download his demonstration image with a link in the description beneath the video so you can follow along as Nace demonstrates the easy-and-effective procedure.

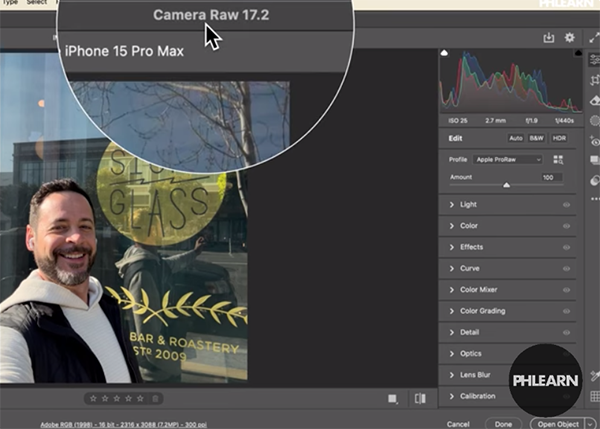
Nace begins with a casual portrait of himself on the street in San Francisco. Unfortunately there’s greenery and other elements behind the camera position that are reflected in the store window that serves as a backdrop for the image. As the lesson unfolds you will quicky contemplate other applications for this tool beyond reflections on glass—like those involving ponds and lakes, puddles, and other reflective surfaces.

In less than four minutes you’ll learn “how to activate ACR’s Technology Preview and utilize the intuitive Reflection slider to reveal a clear view behind the window.” He provides other examples and illustrative photos to make your understanding of this exciting new tool as clear as glass.

Nace says he’s particularly excited about this tool because it actually provides you with choices. For example, “You can choose to just see a reflection and nothing else or reveal the contents inside of the window. It’s amazing and available right now.”

It important to note that this technique only works with Raw files, i.e. Jpegs are not supported at this time. Nace opens a DNG image in ACR, then navigates to Technology Previews where you can check a box to enable the New AI Features and Settings Panel. This includes options like Generative Expand, Reflection Removal, and Denoise.

Another heads up is that once you’ve checked the aforementioned box, it’s necessary quit and relaunch Photoshop for yourr selection to take effect. As for practical tips on using the Remove Reflections tool itself, we’ll step aside and let you watch Nace demonstrate how quickly it works.

The PHLEARN YouTube channel has over two-million fans, and you might want to take a look at what’s available and subscribe.

We also recommend watching a tutorial we featured with another post-processing expert who demonstrates how to embellish nighttime cityscape photographs in Lightroom Classic with pro tips from the streets of Paris.

1N41725.png

DEPTH OF FIELD: Don't Believe Everything You've Heard (VIDEO)

The concept of depth of field describes one of the most important determinants of how your outdoor photographs will appear. If you’ve ever captured the identical scene with two different f/stop settings, you at least have an inkling of how this works.

But here the rub: Some photographers fall for the popular misconception that they should always shoot with a wide aperture to achieve a soft background that separates the main subject from surrounding areas with the frame. This tutorial from the Newcastle Photography College begs to differ by demonstrating an effective, alternative approach.

Our unnamed instructor is an Australian pro who’s determined to pass on the wisdom that he’s accumulated over the past 40 years in the field. He kicks off this 12-minute episode with a warning: “Don’t just follow the crowd by using large apertures and narrow depth of field.”

His point is that we have a wide range of choices with both aperture and shutter speed and it’s your responsibility to explore them and discover what combination works best for just about every image you shoot. With this awareness your photos will display varying amounts of depth and dimension depending upon the exact look you desire.

The bottom line is this: “A greater depth of field may allow you to create a more interesting story with you images.” He admits that this approach takes a bit of some planning and skill, and he walks you through the why and how of getting the job done to perfection.

It also true that “correct” depth-of-field is a very subjective matter because we all have our preferences as to how a scene should look. Or as our instructor says, “I’m not asking that you blindly follow my way, just that you keep your mind open to the possibilities of using a sharper foreground and background to enhance the viewer’s experience.”

This straightforward technique is discussed in the context of environmental portraiture, but it also works wonders for all sorts of outdoor photos—be they landscapes, action shots, or nature and wildlife images. It boils down to another way of viewing the world around us and experimenting with what’s revealed in the demonstration images below.

Be sure you click “View on YouTube” in the black box below. The Newcastle Photography College YouTube channel is a great source of how-to videos that are sure to enhance your abilities, so be sure to take as look.

And don’t miss our recent primer on photographing fast-moving subjects that will help you determine whether to freeze the peak of motion or intentionally blur the subject to create a unique representation of speed.

https://youtube.com/watch?v=g7Y9DPP5LZg

1PS41725.png

Quick Image-Editing Tricks That Every Photo Editor Should Know (VIDEO)

We’re all looking for ways to improve our image-editing workflow by getting the task done faster while achieving great results. Today’s tutorial does exactly that by revealing five Photoshop tips and tricks that you’ve likely never tried.

The eye-opening episode is the 15th installment in a unique series from the Easy Photoshop YouTube channel that specializes in how to videos that unlock alternative post-processing techniques that are easy to employ. Today you’ll learn five simple-and-effective Photoshop tricks in barely five minutes.

This lesson is different than most because it proceeds without dialogue, so all you have to do is sit back and watch how to put this handful of Photoshop techniques to work. Our unnamed instructor based in Pakistan summarizes his goal in the description beneath the video it like this: “Whether you’re fixing tricky edits, improving workflow, or just discovering hidden features, these tips will make your editing easier and faster.”

While these five “game-changing” tips are straightforward and powerful they’re frequently overlooked, even by experienced users. And we’re quite confident that you’ll want to add them to your Photoshop bag of tricks.

Because this is a visual tutorial we’re not going to intrude with any more words of our own. Just sit back, launch the video, and learn what you’ve been missing. Then head over to the Easy Photoshop YouTube channel for more post-processing advice. You’ll also find previous episodes in this particular series.

And be sure to watch a tutorial we featured recently from another image-editing expert who demonstrates the power of Adobe Camera Profiles and why using them for post-processing in Lightroom delivers far more control for achieving photographs with the specific effect you desire.

1EB41725.png

Beginners Guide to On-Camera Flash: It's Really Quite Easy (VIDEO)

Last month we brought you an inspirational video demonstrating why a simple flash can greatly improve all sorts of photographs made indoors or out. It was an illustrative piece without much technical information. Today’s tutorial covers the how in simple terms that beginners can understand.

Instructor Emma Birman is a professional wedding photographer who knows how important an affordable flash can be. She presents this 14-minute guide in the context of her specialty but everything you’ll learn is applicable to other genres as well. And like in last month’s video, her primary goal is to help you overcome a needless fear of flash.

As she says, “I’ll guide your through everything you need to know for mastering on-camera flash to create stunning photos.” She does this by discussing why different types of light impact how you proceed, lighting terms you should know, comparing results between on-camera and off-camera flash, and the pros and cons of each.

The comprehensive video also delves into an exploration of “diffusion,” and Birman’s gear recommendations. But the definitions come first so you won’t be confused. She explains the the meaning of “ambient light,” that the term “strobe” is just another word for flash, and the concept of “TTL” flash. Anther term you need to understand is “synch speed.”

With all that out of the way Birman moves on to practical advice for making a flash your friend. Sitit down with pen and paper in hand so you can jot down a few notes for future reference, then click the “play” button to begin your journey into simple flash photography with confidence.

Once the video concludes head over to the Aftershoot YouTube channel where there’s much more to learn about shooting techniques, photo equipment options, and straightforward post-processing methods.

And don’t forget to watch the video mentioned above with an Australian pro who provides several compelling examples of how the use of flash can create eye-catching images that would be difficult or impossible to mimic with nothing but ambient light.