Do you understand the interplay between the focal length of a lens and angle of view? It’s an important relationship to understand, and this video from a German pro will bring you up to speed in the next seven minutes.
Rainer Hoffmann is an excellent photographer who specializes in travel and landscape imagery that has appeared in numerous publications, books, calendars and the like. He’s also a very experienced educator—conducting workshops, in-person classes, and numerous online courses for over 20 years.
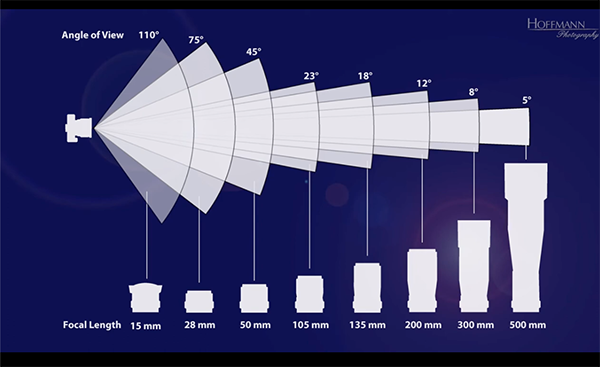
He introduces today’s explainer like this: “The focal length of a lens is an important parameter, however it tells us nothing about what we’re really interested in when we use a specific lens. Therefore, the angle of view is more important.” There’s also a link in the description beneath the vide for downloading a helpful chart of typical focal lengths for different sensor sizes.
Hoffmann illustrates today’s lesson with excellent graphics that make both concepts very easy to understand. Unlike with angle of view, all lenses are marked with their focal in millimeters— either on the barrel or at the front. Zooms offer a range, while prime lenses are limited to a fixed focal length and tend to be much faster.
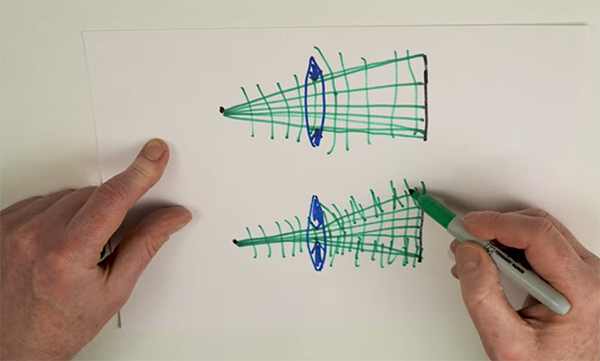
The lesson begins with some quick physics before moving on to practical matters and Hoffmann puts it like this: “Focal length is simply the distance from the central plane of the lens to the focal point (the point where all the light rays converge).” But Hoffman says that what we really want to know is how much of a scene will appear within the frame when we use any given lens.
Hoffman demonstrates why this is where angle of view comes into play, as does the sensor size of your camera. Thus, an image made with a 50mm on a full-frame camera appears significantly different from photos shot with the same lens on an APS-C or M/43 camera.
Fortunately there’s a simple relationship between focal length and angle of view: “A short focal length means a wide angle of view while telephoto lenses have a much narrower angle of view (expressed in degrees).” And, as you’ll see, here’s when sensor size factors into the equation.
The good news is that you needn’t member all the numbers and degrees, because all this will quickly become second nature once you get the hang of it. And don’t forget to download the helpful reference chart mentioned above. Then head over to Hoffmanns popular YouTube channel where there are many more straightforward primers available.
Wouldn’t it be great if you could dramatically improve your photos by simply changing four camera settings? This sounds like a tease but it’s actually a fact, according to professional photographer Jared Collins, who specializes in teaching less-experienced shooters how to avoid common mistakes.
Collins begins with a discussion of your camera’s Aperture Priority exposure mode. When first getting started with a DSLR he listened to the chatter and used Manual mode instead. As a result, “I spent several years turning dials and changing settings completely unnecessarily.” He then experienced a eureka moment after someone convinced him to try Aperture Priority.
He doesn’t deny that Manual mode provides maximum control in some situations, and he occasionally takes this approach himself. But if you hear him out you’ll better understand the many benefits of switching your camera’s Mode dial to AV (without any feelings of guilt).
Next on the list are your camera’s drive settings and Collins makes a prediction “I believe that you should be shooting in Burst mode more often than you did in the past.” He explains his reasoning with a question: “How many times have you been on location, thought you captured the moment perfectly, only to learn later that the subject blinked just as you pressed the shutter button?”
In other words, a high-speed burst can come in super handy if anything moves at the decisive moment, which is why Collins says he configures his camera accordingly 90% of the time. It’s better to be safe than sorry, “even if you have to sort through more images because storage is cheap.”
As the episode progresses you’ll learn when and why Collins recommends shooting at high ISO values without taking things too far. He also explains why the Continuous AF mode can really pull you out of a jam.
So go grab your camera and experiment with configuring it differently based upon Collins advice. Then pay a visit to his instructional YouTube channel where you’ll find a variety of straightforward tricks and techniques for upping your game.
And don’t miss the explainer we featured recently with another popular instructor who demonstrates how he captures photographs with maximum depth of field by setting his lens to the “hyperfocal distance.”
You’re in for a surprise if the important concept of “diffraction” is unfamiliar because this optical phenomenon, or spreading of light waves, has likely degraded some of the photos you captured in the past. The problem typically occurs when shooting with small apertures and image softening is the result—especially in areas of high-contrast.
The good news is that this unsightly problem will be a thing of the past after watching the video below from the My Photo Journey YouTube channel. Instructor Dawley Lad is an accomplished British outdoor photographer whose behind-the-scenes tutorials are always revealing and perhaps what you’d call transformational.
In today’s episode you’ll follow Lad strolling through Lincoln’s historic Bailgate area with a DSLR in hand as he photographs two picturesque spots, the well-known Whiskey Shop and the Wonky Shop. He poses this question for starters: “If you’ve ever wondered why your photographs aren’t sharp at very small apertures, I’ll show you exactly why this happens and how to avoid it.”
The video begins with a quick theoretical discussion of when and why diffraction becomes a potentially image-killing problem—no matter how many megapixels your camera has. In simple terms, diffraction occurs because light tends to disperse or diffract when it passed through a small opening like f/22.
Lad clearly illustrates how diffraction works by shooting multiple images of his subjects—some with his lens opened up to f/4 and others stopped all the way down to f/22. Then he returns home, opens the photos side-by-side in Lightroom, and evaluates them carefully.
As you’ll see, shooting at minimum aperture resulted in a significant loss of image quality and sharpness. Bottom Line: Don’t bend it like Beckham!
We recently posted another helpful primer for beginners that’s closely related to this one. So take a close look and learn how to master your camera’s ISO settings so you can capture stunning photographs in all lighting conditions.
You might think that the world has enough 24-megapixel full-frame cameras by now, but you would be wrong. With image quality having reached a performance plateau, the only way to improve is by going faster. Last year, Nikon released its Z6 III, debuting a new partially stacked sensor. We wondered when another camera might come out that utilizes this same excellent technology, and now that wait is over.
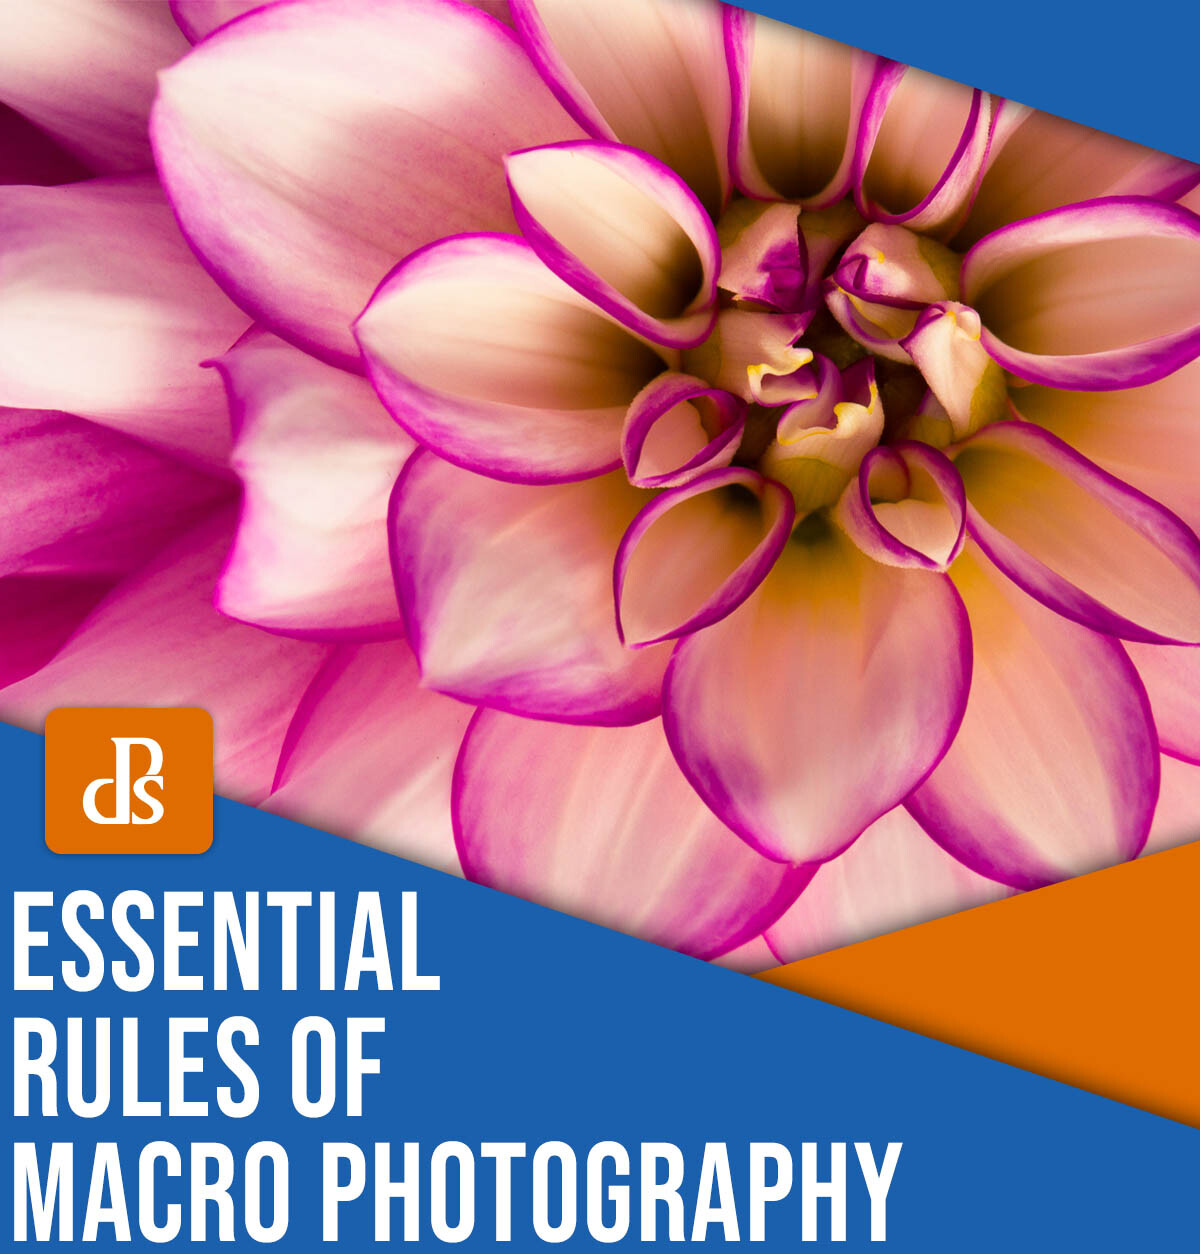
Talk to any macro photography expert, and they’ll likely give you a few handy rules that are designed to help you improve your shots as quickly as possible. These rules can be insanely helpful, especially if you’re just starting out – but they can also be restrictive, frustrating, and very problematic.
So while it pays to explore a handful of essential macro photography rules, it’s important that you also understand how to break them effectively. That way, you can take advantage of the rules when they suit your photos, and you can break them as needed, too.
In this article, I share five key rules of macro shooting. I explain what they are, how you can use them to level up your shots, and when you might want to deliberately ignore the rules for the best results. Note that I offer plenty of examples from my own work so you can see precisely how following – and breaking – different rules will affect your images.
Let’s dive right in!
1. Use the rule of thirds
Let’s dive into the most talked-about rule in photography – yes, it’s the one with “rule” in its name! Meet the rule of thirds, a simple yet powerful concept that is designed to keep your compositions both dynamic and balanced.
The rule of thirds is simple: Divide your viewfinder, screen, or LCD into both vertical and horizontal thirds. This creates a grid. The main elements of your composition – horizon lines, leading lines, faces, eyes -should lie somewhere along these lines. If they fall on one of the “power points” of the grid – the place where the lines intersect – that’s even better.
The place where the stem meets the petals of this tulip lies on a rule of thirds power point.
How does this apply to macro photography?
Often, you’ll be advised to position flower stems along the rule of thirds grid, and you’ll be told to place flower centers along the power points of the image. The same goes for insects and leaves.
The center of this dahlia is positioned at one of the power points on the rule of thirds grid.
It’s solid advice that has stood the test of time, yielding delightfully pleasing compositions. But sometimes it’s best to break out of this mold and get something a bit edgier, a bit more unique.
Let me tell you about two scenarios when I like to break the rule of thirds.
The first instance you should break the rule is when you have a symmetrical subject. Symmetry can be very powerful, and it’s usually best emphasized by putting the point of symmetry (the place around which the image is symmetrical) in the dead center of the image.
The second time you might choose to break the rule of thirds is when you want to have a more spacious, off-balance image.
I like to place my main subject at the very top or bottom of the image and leave tons of negative space throughout the rest of the composition. This can produce a minimalist feeling, one that I really love.
Now, don’t get me wrong. The rule of thirds is a tried-and-true technique that has elevated the visual arts for centuries. But don’t be afraid to move beyond the rule of thirds to create original photos!
2. Keep it simple
Another common macro photography rule? Keep your compositions simple.
In other words, you should have one point of focus, no distracting elements, and a clean and straightforward image. According to this rule, the best shots often contain a single subject and a uniform (often white or black) background.
Indeed, this is often a wise approach. Random chaos can take away from the main subject and cause the viewer to become confused.
However, controlled chaos might be just the thing you need to create a unique image.
I like to use controlled chaos when I’m faced with a complex scene, such as a field of many overlapping flowers. The key is to make sure there is a main subject that stands out and can be identified as the main point of focus by the viewer. (At the same time, it’s okay to let the background or foreground get a bit messy as long as it complements the main subject.)
The flower on the left creates order in an otherwise messy composition.
Just make sure you choose your framing carefully to prevent the image from devolving into chaos, and make sure that the main subject is tack-sharp. It’s a fine line between having a complex but controlled image and making a big mess.
3. Have a single point of focus
Macro photographers are often told to compose with a single point of focus (i.e., a prominent area that the eye can focus on). It’s a great way to prevent the composition from becoming too chaotic (see the previous section), and it can provide an anchor point for the viewer as they appreciate the photo.
But while there is a time and a place for this rule, there are also scenarios when it should be broken.
For instance, when faced with a noticeable pattern among leaves, flowers, or ferns, it can be better to think less in terms of a point of focus and more in terms of the image as a whole. Try to emphasize the pattern so the eye can follow it through the image. You might even consider getting ultra-close or deliberately missing focus for an abstract effect.
You may not end up with a single point of focus, but assuming you frame the scene carefully, you’ll still end up with a pleasing shot!
4. Use a uniform background
Uniform backgrounds are very popular in macro photography. In fact, macro photographers will often shoot on a completely black or pure white backdrop in pursuit of background uniformity.
The rule emphasizing uniform backgrounds makes sense: the more uniform the background, the less distracting it’ll be. I use it often myself.
But it’s also a rule that I often break, and here’s why:
Uniform backgrounds can be…kind of boring. More colorful uniform backgrounds are better, but sometimes even they aren’t enough.
If you really want to take your macro photos to the next level, you may wish to consider moving beyond those simple backgrounds. Instead, look for backgrounds that are complementary. In other words, find backgrounds that offer a bit of substance while enhancing the main subject.
One trick is to place a second subject just behind the first. Choose an aperture that keeps the second subject slightly out of focus but still recognizable. That’s how I captured this shot, which features a background of blurry tulips:
Another trick is to shoot toward the sun so that you get creative flare effects and beautiful highlights:
But be careful: You don’t want to go from uniform to messy. The key word is “complementary.” Have fun with your macro backgrounds, but make sure you exhibit restraint!
5. Make sure the whole subject is sharp
“Keep the main subject sharp” is a foundational rule of macro photography. The idea is to ensure that your entire subject – and not just the front or back edge – is sharp; that way, it’ll offer beautiful, crisp, lifelike details.
According to the rule, if you’re shooting a butterfly, make sure that it is sharp from wingtip to wingtip. When you’re shooting a flower, make sure that it’s sharp from the tip of the front petal to the edge of the back petal.
Sometimes, it won’t be possible to get the entire subject sharp, in which case the rule advises you to get as much in focus as you can. (You do this by narrowing the aperture. It’s common for macro photographers to shoot at f/8 and beyond for this reason!)
But while an in-focus subject does tend to look nice, you can create wonderfully emotive shots by ensuring that very little of your subject is in focus. It’s a technique I use all the time, as you can see in the photos displayed throughout this article, and it can be a great way to produce more abstract, unique images.
How can you create such an effect? Simply dial in a wider aperture and get close to your subject. I often work at f/4, but you can achieve good results at a variety of different apertures; just experiment and see what you can create.
(One tip: Focus manually, and try to set the point of focus on a recognizable part of your subject, such as a leaf or the edge of a petal. Though most of the shot may be unrecognizably soft, you want to include an anchor point for the viewer.)
Macro photography rules: final words
Macro photography rules can certainly be helpful – and if you’re a beginner, I encourage you to memorize each and every rule listed above. I’d also recommend practicing incorporating each rule into your photos.
But remember: Macro photography isn’t just about following a set of rigid rules. It’s an art form, a way to express your unique perspective and unleash your creative spirit. So don’t be afraid to bend and break those rules when the moment calls for it.
Embrace the power of the rule of thirds, but don’t be bound by it. Sometimes, symmetrical subjects demand center stage, while other times, a little off-balance magic can create minimalist masterpieces.
And let’s not forget the beauty of simplicity. Keep it clean, keep it focused, but don’t be afraid to break free from the chains of predictability. Surprise your viewers with unexpected elements and unleash their imagination.
Now grab your camera, capture some macro shots, and think about different rules as you photograph. Rules are meant to be broken, and if you’re willing to think outside the box, you can end up with gorgeous images!
Now over to you:
Which of these rules do you like (or dislike)? Do you have any rules of your own that you like to break? Share your thoughts in the comments below!
var dpsTopics = {
id: 150250,
titles: [{“id”:”use-the-rule-of-thirds”,”permalink”:”https://digital-photography-school.com/5-rules-macro-photography-when-break-them/”,”title”:”1. Use the rule of thirds”},{“id”:”keep-it-simple”,”permalink”:”https://digital-photography-school.com/5-rules-macro-photography-when-break-them/”,”title”:”2. Keep it simple”},{“id”:”have-a-single-point-of-focus”,”permalink”:”https://digital-photography-school.com/5-rules-macro-photography-when-break-them/”,”title”:”3. Have a single point of focus”},{“id”:”use-a-uniform-background”,”permalink”:”https://digital-photography-school.com/5-rules-macro-photography-when-break-them/”,”title”:”4. Use a uniform background”},{“id”:”make-sure-the-whole-subject-is-sharp”,”permalink”:”https://digital-photography-school.com/5-rules-macro-photography-when-break-them/”,”title”:”5. Make sure the whole subject is sharp”},{“id”:”macro-photography-rules-final-words”,”permalink”:”https://digital-photography-school.com/5-rules-macro-photography-when-break-them/”,”title”:”Macro photography rules: final words”},{“id”:”use-the-rule-of-thirds”,”permalink”:”https://digital-photography-school.com/5-rules-macro-photography-when-break-them/”,”title”:”1. Use the rule of thirds”},{“id”:”keep-it-simple”,”permalink”:”https://digital-photography-school.com/5-rules-macro-photography-when-break-them/”,”title”:”2. Keep it simple”},{“id”:”have-a-single-point-of-focus”,”permalink”:”https://digital-photography-school.com/5-rules-macro-photography-when-break-them/”,”title”:”3. Have a single point of focus”},{“id”:”use-a-uniform-background”,”permalink”:”https://digital-photography-school.com/5-rules-macro-photography-when-break-them/”,”title”:”4. Use a uniform background”},{“id”:”make-sure-the-whole-subject-is-sharp”,”permalink”:”https://digital-photography-school.com/5-rules-macro-photography-when-break-them/”,”title”:”5. Make sure the whole subject is sharp”},{“id”:”macro-photography-rules-final-words”,”permalink”:”https://digital-photography-school.com/5-rules-macro-photography-when-break-them/”,”title”:”Macro photography rules: final words”}] };
The DJI Mavic is the all-around choice for midrange professional use, and now we get to witness the fourth version in all its splendor. Much like the 3 Pro that comes before it, the Mavic 4 Pro features a three-camera array on a sophisticated gimbal using Hasselblad color science to provide stunning photos and videos.
Samsung looks to trim some fat and return to an age when smartphones can be unapologetically thin again. That’s the Galaxy S25 Edge in a nutshell. Samsung’s latest premium device is the lightest it has made in years.