1A52325.png

Is Your Lightroom Catalog a Freaking Mess? Fix It Like This (VIDEO)

It’s time for some belated spring cleaning if you waste time struggling with a disorganized Lightroom catalog that’s difficult navigate. If you’ve skipped this one-time housekeeping task because it requires a bit of thought and effort, think about all the frustration you’ll avoid by having all your images at your fingertips in logical folders where they’re easy to find.

Instructor Austin James Jackson says that “most photographers don’t have the best habits when organizing their catalogs and, unfortunately, this is one of the last things they consider when learning to use Lightroom.” His goal for today is to demonstrate how he increases efficiency and speed by doing things right.

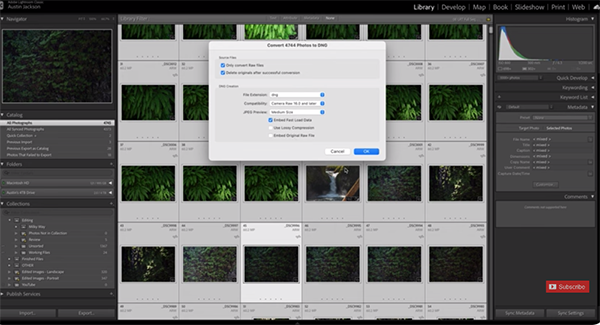
We refer to this as a one-and-done process because once you’ve established a clean framework that works best for you, keeping track of future additions to the library will be a piece of cake. The lesson also discusses the implications of working with an external drive, and the benefits of converting image files to the standardized DNG format.

There’s also a few timesaving tricks for importing photographs to a new Lightroom catalog. The entire process is far easier to follow by listening to Jackson with his illustrations on the screen, so we’ll forgo our usual overview and let the expert demonstrate the best way to clean up your act.

Jackson’s instructional YouTube channel is full of shooting techniques for landscape photographers, along with  post-processing advice that’s appropriate for beginners and experienced Lightroom users alike.

And be sure to watch the tutorial we featured recently with another popular image-editing instructor who demonstrates how to use Lightroom’s Generative Fill capabilities to clean up his photographs and eliminate unwanted objects and other distracting artifacts.

1BJ52325.png

Understanding Camera Drive Modes: Which One to Use When (VIDEO)

All cameras feature a selection of Drive Modes, whether your weapon of choice is a DSLR, mirrorless model, or a full-featured compact. Choosing the appropriate setting for the task at hand will simplify a shoot and increase your odds of success.

Instructor Benjamin Jaworskyj is a self-taught German photographer and adventurer whose basic tutorials take you behind the scenes as he demonstrates simple techniques that shooters of all skill levels can employ to elevate their skills. By the time this nine-minute episode concludes you’ll approach the topic with confidence and know when and how to use Single mode, one of the Burst settings, and even one of the two Self-Timer options.

Ben begins with the Single mode which is the setting most photographers use. Simply focus on your subject and capture the shot. This mode works well for landscapes, environmental portraits, and other situations when there’s no movement within the frame.

The Continuous mode, on the other hand, is a better choice when photographing subjects in motion, like birds in flight, wildlife on the ground, and a variety of fast-moving action-sports images. In this case the camera will typically offer of choice of three burst settings—Low, High, and High+. Keep in mind that the nomenclature varies from one camera to another.

Ben explains that when one of the Burst modes is selected, the camera will keep shooting at the chosen rate until you remove your finger from the shutter button or the camera empties its buffer. The speed of the buffering process depends upon the camera in use and whether you’re shooting Jpegs, Raw Files, or Jpeg and Raw.

Another consideration of note is the speed rating of your memory card, and this is super important when shooting at the highest burst rate or when making videos. There are a few other details to keep in mind—just follow Ben’s advice.

The video concludes with an overview of your camera’s Self-Timer settings, because these also fall under the category of drive modes. And there are usually two options: the two-second default and another with a 10-second delay.

Ben’s instructional YouTube channel is a great source of information, especially for beginning photographers who will benefit by learning the basics.

We also suggest watching another straightforward primer we featured recently that demystifies lens focal length and explains why there’s more to this concept than just magnification.