In February, the Associated Press (AP) was banned indefinitely from the White House and Air Force One over its stylebook entry for the Gulf of Mexico, setting off a series of legal challenges. Today, a U.S. federal judge sided with the Associated Press, ruling that because of the First Amendment, the government cannot bar journalists from certain government events because of their viewpoints.
Award-winning German photo lab WhiteWall announced two new solutions to help customers achieve sharper, better prints. WhiteWall SuperResolution promises improved image quality when printing smartphone photos, while the existing UltraHD sharpening is available for more products.
Last week we featured an interesting video from one of favorite wildlife and landscape photographers who insists that your camera’s Aperture Priority mode is preferable to shooting in Manual for certain situations. We’re following up on that today with a quick tutorial from Vanessa Joy who demonstrates how to use shutter speed to capture images with a variety of creative effects.
Joy is a long-time pro based in both Austin and NY with over two decades of experience. She’s also a Canon Explorer of Light and a very popular educator. In the next seven minutes you’ll gain a better understanding of the concept behind this important component of the Exposure Triangle and different ways to use this setting for attention-grabbing results.
The episode begins with Joy explaining why “shutter speed is one of the most powerful tools in your photography arsenal” and how interacts with the other two elements of the Exposure Triangle: namely Aperture and ISO. Other topics of conversation include an overview of when and why shutter speed matters and guidelines for making the best choice depending upon the specific task at hand.
Joy presents everything in simple terms that even beginners can grasp with ease. The basic premise is this: The strategy you use to photograph kids, for example, differs greatly from the best option for capturing fast action like sports, racing cars, and birds in flight. And of course, the best approach for landscapes, still-life photos, and other stationary subjects is also significantly different.
Another key consideration involves the concept of image stabilization. Here Joy carefully explains how this features works to boost your odds of success, as well as “what it doesn’t do for you.” It’s also essential to understand exactly how the focal length of a lens affects your shutter speed choice.
Once all these basics are out of the way, Joy turns her attention to the creative aspects of fast shutter speeds for freezing action, the artistic implications of employing slow shutter speeds to capture captivating images of fast-moving subjects, and a simple trick for adding an appealing in-camera motion blur effect to your photos.
And don’t forget to watch the tutorial we mentioned at the onset with one of our favorite wildlife and landscape photographers who insists that your camera’s Aperture Priority mode is preferable to shooting in Manual for certain situations and conditions.
Since I started using ball heads in balanced mode, I’ve been a very happy camper. In this article, I’ll be sharing a review of multiple ball heads as well as a tutorial about using ball heads in the balanced mode.
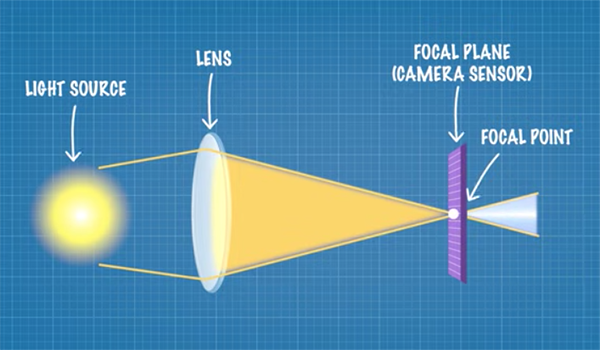
Have you ever been out in the field on a spectacular day, only to return home, open the images on the computer and discover that they’re unacceptably soft? We’ve all suffered this misfortune at least once, and today’s tutorial from Photography Explained reveals three oft-ignored “secrets” for resolving the problem with whatever camera and lens you currently own.
Our unnamed instructor is an accomplished British photographer and educator whose stated goal is creating how-to videos that “help amateur shooters get better at their hobby so they can capture better photos.” In the next 13-minutes you’ll how easy it is for photographers of all skill levels to sharpen up their act.
If you’re frustrated by soft details you’ll be happy to learn that, according to our instructor 99% of sharpness issues aren’t the fault of your camera. We’ll give you the takeaway up front: “Stop spending money on expensive new gear until you understand these fundamental photography principles.”
The recommendations in this episode will enable you to accentuate details in key areas within the frame, deal with edges lacking definition, and more so that razor-sharp images will be a common occurrence for you from now on.
This wide-ranging conversation explains the science behind concepts like “micro contrast” and the “circle of confusion” with step-by-step advice for putting these transformational notions to work. The video then takes a deep dive into today’s “game-changing secrets that nobody shares.”
Here’s a quick list of the key concepts and solutions: determining the most appropriate shutter speed, finding the optimal aperture of your lens (typically f/5.6-f/11), and the best stabilization techniques in the camera when shooting handheld or making the most of tripod to avoid both camera shake and subject movement.
After solving these common “operator failure” issues you’re likely to fall in love with your existing camera once again! The Photography Explained YouTube channel is great source of shooting and post-processing techniques for stepping up your game.
And don’t miss the eye-opening tutorial we featured with another popular instructor who demonstrates when, why, and how your camera’s Aperture Priority mode is a better choice for wildlife, nature, and landscape photography.
We all spend hours cultivating our skills, to say nothing about the hard-earned cash we invest in the best gear we can afford. So it’s often quite traumatic when we lose some or all of our work due to incorrect storage techniques or the improper care of memory cards and backup devices.
Today’s tutorial with instructor Forest Chaput de Saintonge concentrates on the latter concern rather than the “3-2-1 Backup Rule” that we’ve discussed in the past. He’s a professional photographer, acclaimed educator, and former Director of the Rocky Mountain School of photography while serving as an Adobe Lightroom Advisory Board Member in his “spare time.”
Forest covers nine critical issues in less than nine minutes beginning with something as simple as the cord attach to the portable drive that you carry in the field or while traveling. The warning it to always remove the cord before stashing the drive in your bag or pack. As Forest explains, “I’ve seen more ports broken off the inside of a portable hard drive than crashed drives.”
That’s because these ports are fragile and can be easily damaged when an attached connector bangs against other gear in a bag. Next is another practice many of us have been guilty of in the past; namely, editing photos while sitting on the coach or bed with our computer in our laps.
As Forest says of this contentious recommendation, “Of all the things I see that causes image corruption and catalog corruption is when a hard drives comes unplugged during an editing session while working on a soft surface.” For those of you who are a committed “couch” editor” he reveals a simple accessory that will keep you and your imagery out of trouble.
Forest demonstrates other common problems and solutions as the eight-minute lesson proceeds and they’re all intended to help you avoid the largest headache ever. His discusses best practices for memory card formatting and sharing, and the importance of keeping multiple drives separate. There’s also this blunt statement: “No more dongles.”
The video includes a discussion of USB hubs, using dual card slots in cameras with this capability, and some specific concerns with backing up on the Cloud. Make yourself a checklist of everything you learn, follow it carefully, and your photos and other files will be a safe as can be.
We also recommend watching a tutorial we featured recently with another knowledgeable photographer who explains how new AI technology can eliminate time-consuming snags when organizing, culling, and processing your photographs.
Here’s another quick post-processing tutorial from instructor Scott Davenport that photographers of all skill levels can use to significantly enhance cityscape photos, landscape scenes, and adjust any other outdoor images that need a bit more oomph. It’s all about when and how to use Lightroom’s powerful Dehaze tool.
This straightforward adjustment can also be accomplished with ON1 Photo Raw, Luminar Neo, and any other editing software you use that includes a Dehaze slider. Davenport is a notable outdoor photographer specializing in seascape imagery, architectural photos, and images shot in the urban environment.
Here’s Davenports promise for today’s how-to video that runs less than five minutes: “I’ll show you how your Dehaze tool transforms flat, dull architecture and cityscape photos into vivid dynamic images” in ways that are equally appropriate for other types of dull photos shot in the field that are less impactful than they could be.
Davenport begins with a quick explanation of how haze is often caused by atmospheric conditions or pollution, and the manner in which it effects your photos in different ways. The typical problem is that haze tends to wash out important details and reduce contrast—especially in the midtones of an image.
In the latter regard, you’ll learn how to selectively apply the Dehaze tool only where needed, rather to the overall shot, to increase Clarity and strategically reduce the abundance of middle grays. Doing so makes subjects “POP” by enhancing dimensionality and increasing the perception of depth throughout the frame.
But what about those rare instances when the Dehaze approach falls short of 100% perfection? Davenport has another trick up his sleeve: “”When Dehaze is not enough, double down on reducing middle grays with Curves. You can also use Curves to address midtone-heavy images to deepen shadows and have textures reemerge. And you’ll see exactly what to do.
The bottom line is this: it’s easy to accentuate lines and interesting shapes with just a few thoughtful adjustments. There’s much more to learn about outdoor photography techniques on Davenport’s instructional YouTube channel.
We also recommend watching the recent tutorial we featured with another post-processing expert who demonstrates the power of Contrast Masking for editing snow-covered landscapes, bright beach photographs, and other outdoor scenes with an unusually wide range of tones.
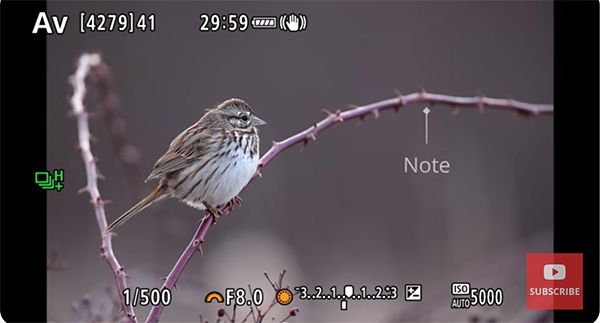
We’ve all heard the blather from so-called purists who insist that “you’re not a real photographer unless you shoot in Manual mode.” Well, some beg to differ, including today’s instructor Simon d’Entremont who explains why many pros (including himself) prefer Aperture Priority (AV) mode instead.
Simon is a Canadian nature and wildlife photographer and educator who says, “My mission is to lift the knowledge, skills, and spirts of the photographers around me so they can be at their best.” Today’s episode has the power to change how you shoot in the field forever more, simply by rotating your camera’s Mode dial.
The video begins with a controversial claim that Aperture Priority is not only much easier, but it’s the most advanced mode on your camera. In other words, switching the dial off Manual delivers the best of both words, and in the next 12 minutes you’ll learn when, why, and how to use AV mode for maximum results without missing a shot while fumbling around with Manual settings in ever-changing light.
Simon discusses different types subjects and conditions, while explaining how to approach them with confidence. He provides real-life examples in the field, as well as some trouble shooting tips when things don’t go as expected. Then he pulls up several superb images of birds captured in Aperture Priority mode that provide all the evidence you need.
This eye-opening lesson is presented in the context of wildlife photography, but it’s important to note that everything you’ll learn will apply equally to virtually all photographs you capture outdoors. It’s all about managing certain settings that are important to you, while letting the camera control the rest, and that’s exactly what Aperture Priority enables you to do.
There much more to learn about gear, post-processing, and wildlife photography on Simon’s instructional YouTube channel. So be sure to take a look when you have time to explore his how-to videos.
And speaking of wildlife, don’t miss the earlier tutorial we featured on this topic with another expert who demonstrates how to capture high-action photographs of fast-flying birds. The straightforward techniques can be used with any camera system you own.
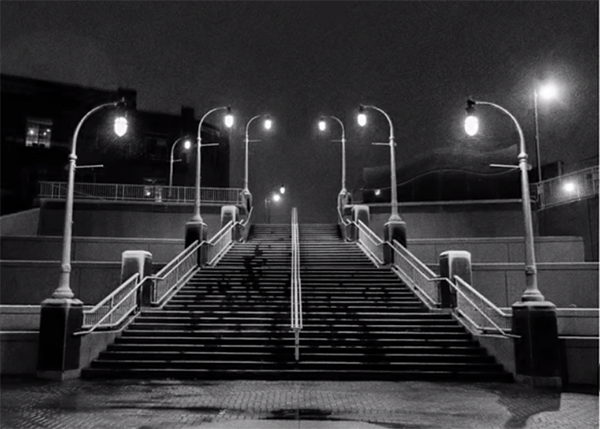
Today’s inspirational how-to video from The Photographic Eye YouTube channel takes a close look into why some scenes literally beg to rendered in b&w, with a specific emphasis on the interplay between deep shadows and other areas within the frame. The episode begins with a request that you “think about the first time you fell in love with photography.”
What comes to mind may be determined by your age, and for longtime pros like Alex Kilbee the remembrance goes like this: “For me it was seeing my first black-and-white photographs emerge from the watery birthing pool in the darkroom right before my eyes.” Whether you make a living with a camera, or you approach photography as a creative outlet, Kilbee’s straightforward lesson have plenty to offer.
The goal of this 13-minute episode is to help you “add a whole new layer of interest and intrigue to you monochrome images.” Kilbee is a notable photographer in his own right, but he decided to use images in Scott Olsen’s fantastic self-published b&w photography book “Fargo” to describe a variety of b&w techniques that he considers so powerful.
Kilbee discusses all facets of the art, concentrating on his penchant for “running with the shadows of the night.” The methods you’ll learn could also be referred to as the power of emptiness. As Kilbee says, “once you learn how to embrace shadows you’ll develop the ability to convey the world in a way that’s unusual to us.”
Olsen’s book contains an eclectic mix of street photography, artistic portraiture, and even a bit of sports/action. Kilbee says the photos that stand out the most to him are the ones where Scott utilizes shadows with attention-grabbing silhouettes and other dramatic monochrome effects that simply can’t be ignored. In fact, some of Olsen’s work could be misconstrued as photos of sculpturea rather than real life subjects.
This video offers a variety of helpful insights and observations that will enable you to mimic Olsen’s stunning imagery and experiment with making some truly outstanding photos of your own. There’s even some post-processing advice for getting the job done to perfection.
Then take a look at an earlier tutorial we featured with another accomplished pro who demonstrates how using a simple flash can drastically improve yours results when shooting environmental portraits and other subjects outdoors.
It may still be a bit cool for a swim at the beach, but that doesn’t mean it’s too early in the season for a sensuous boudoir shoot on a nice day. And that’s what you’ll learn how to do in this behind-the-scenes tutorial from acclaimed expert Michael Sasser.
Sasser is a West Coast pro based in Orange County. CA and his instructional YouTube channel is a great source of information on this unique from of portraiture, whether you’re new to the game or just want to upgrade yours skills. Sasser’s videos also include helpful information for monetizing your work once you’re ready for a side gig.
It was an early wake-up call for Sasser and his model so they could arrive at their Hawaiian location before dawn. As Sasser says about this French-inspired lingerie session, “I died and woke up in Heaven” on a perfect day.
Sasser positions his model on a balcony with a crazy breakfast spread on a table as the sun begins to peak above the horizon. Then you’ll see the amazing images he captured, long with the required techniques, so you’ll understand how to create some unique boudoir imagery of your own.
This isn’t technically an available-light shoot because Sasser employs a small battery-operated lamp to help illuminate the area surrounding the table. He explains why he pushed his lamp as far back as possible, and how he determined the best place for posing Amanda to arrive at a well-balanced shot.
In essence, “we’re creating a light triangle between Amanda, the camera, and that light. And that’s what’s allowing for all the beautiful highlights on her body for a three-dimensional shape.”Sasser walks you through a variety other key considerations as the video proceeds. You pick up some great advice for impactful compositions, the appropriate camera settings, and other technical matters. There’s also the critical interplay between foreground and background tones.
It’s interesting to watch how Sasser and his model collaborate on a variety of alluring poses that take great advantage of her striking form. There’s much more to learn about various boudoir photography techniques on Sasser’s YouTube channel, so pay a visit when you have time to explore.