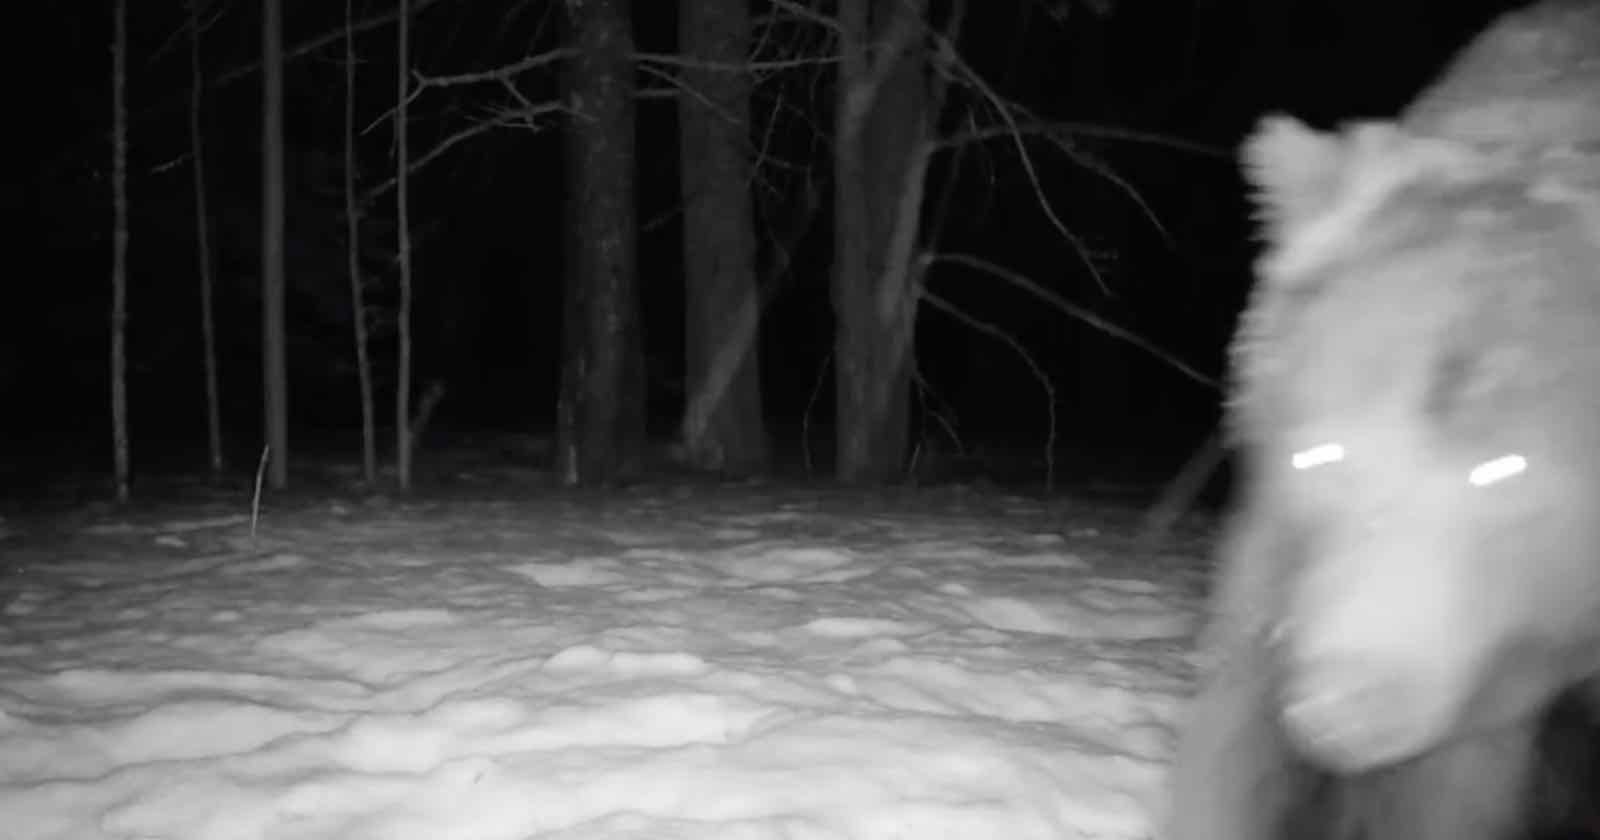
A photographer’s trail camera filmed the “first grizzly bear of the year” near Yellowstone National Park — as the animals emerge out of hibernation.

A photographer’s trail camera filmed the “first grizzly bear of the year” near Yellowstone National Park — as the animals emerge out of hibernation.
![]()
A key designer behind the Pentax 17 half-frame film camera has left Ricoh Imaging, as the company says it is pausing the Pentax film project to evaluate the market.
Have you ever been enthralled with a spectacular panorama image and wondered if you had the necessary gear and skills to do this yourself? The answer is “yes,” and in the quick video below you’ll learn everything necessary for shooting panos to perfection.
Instructor Adrian Caleanu is a professional Canadian landscape photographer whose behind-the-scenes tutorials from awesome locations are designed to help other outdoor shooters discover the world and elevate their skills “one photo at a time.” He kicks off today’s episode with this definition, “A panorama is a wide-angle image created by stitching together multiple overlapping photos to capture a scene beyond the typical field of view possible with a single lens.
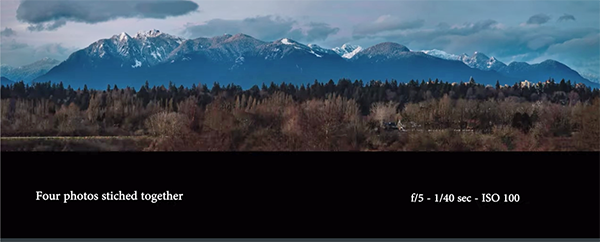
Caleanu’s subject is an expansive vista with a blanket of impressive clouds above snow-capped mountains looming in the distance. He can’t create the composition he desires in a single shot but watch the breathtaking perspective he achieves by using the panorama technique described in the next nine minutes.

The first step is securing the camera and capturing a small selection of images that are carefully merged later during post processing. Caleanu waits patiently until the soft light of Blue Hour bathes the scene, and four carefully aligned shots are all takes. His initial camera settings are f/5, 1/30, and ISO 100 while shooting in Live View mode for reasons he explains.
After shooting the first photo he pans to the right for the next frame while explaining that “when panning to the right you have to carefully overlap each subsequent shot by one third.” He then makes his second, third, and final images using the same technique. As he says, “for me it’s not a question of how many frames I want, but rather how many frames are required to capture the entire mountain range before me.”
Caleanu says he prefers to slightly underexpose his images because “it’s away easy to bring up the shadows but you can’t bring down highlights if they’re blown out and devoid of details.” He creates a second panorama by shifting his view to a nearby airport with plane moving across the runway.

You’ll agree that this technique is quite simple, as are the other tips that you’ll find on Caleanu’s instructional YouTube channel that are just waiting for you to take a look.
Be sure not to miss the tutorial we featured earlier with a Danish outdoor shooter who provides 10 straightforward tips for capturing fantastic photographs of spring flowers with simple gear.
Color grading may seem like a daunting task, especially if you’re an inexperienced Lightroom user. But it’s important to achieve accurate tones because unnatural colors can quickly kill an otherwise great shot.
Instructor James Feaver puts it like this: “if you’re not happy with your colors or you just think they look ugly it usually comes down to one reason: White Balance.” In this quick explainer he demonstrates a “quick trick” for getting far better White Balance in Lightroom. Best yet, you can take advantage of Feaver’s simple tips whether you’re shooting landscapes, nature photos, macro imagery, and even environmental portraits.
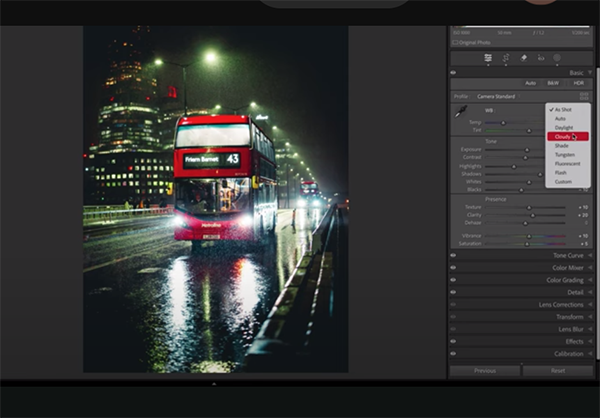
Feaver’s demonstration photo is a perfectly composed and properly exposed image of a street scene after dark. A vivid red double-decker bus draws you into the scene that’s super impactful because of illuminated windows, streetlamps, and reflections surrounding the main subject. So what’s the problem: funky colors that don’t appear as they did through viewfinder.

You may be surprised to learn that this image has already been edited in Lightroom. The result is slightly better than the original file, but let’s face it, it still isn’t good. That’s because Feaver’s preliminary enhancements didn’t include adjusting White Balance. He intentionally skipped this step so he could demonstrate the concept and walk you through the simple procedure in the next five minutes.
The process occurs in Lightroom’s Develop panel by expanding the Basics dropdown menu that includes several easy-to-use sliders with White Balance tools grouped into three sections. There’s the Eyedropper tool, the two main sliders, as well as your Presets.
Feaver begins with the oft-ignored White Balance Presets. There are several available and Feaver notes how they mirror the ones inside your camera, namely Daylight, Cloudy, Shade, Tungsten, and the like. Keep in mind that once you make a choice, say Cloudy, “your camera will always use the Cloudy setting until it’s changed. The good news when you forget (and the purpose of this lesson), is that you can rehabilitate poor color tones by following Feaver’s instructions, after which you’ll want to add this trick to your everyday workflow.

There’s much more to learn on the London-based Photo Feaver YouTube channel, so be sure to take a look.
And on a related note, be sure to watch the tutorial we featured with another post-processing expert who demonstrates why you should use Adobe’s amazing AI-based Adaptive Color Profile as the first-step in processing your photographs.
Today’s quick tutorial from instructor Mark Dumbleton begins with an important question: “Are you unknowingly sabotaging your chances of eliminating noise at extremely high ISO settings? Because there’s a good chance that you are.” If so, that’s about to change once you watch the quick video below.
Dumbleton promises to demonstrate a time-proven post-processing workflow that delivers “incredibly clean and sharp results” so you don’t have to worry about bumping up ISO when dealing with low-light situations, long exposure effects, action shots, and much more.
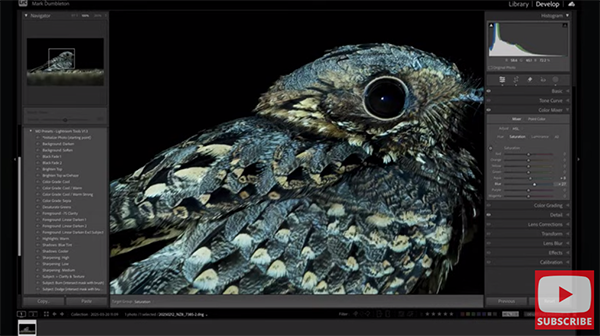
You’ll learn why starting with a well-exposed image is essential for achieving optimum results. But let’s assume you already have a noisy photo that needs to be repaired. Dumbleton’s demonstration shot is a properly exposed bird photo captured at ISO 12,800. It looks quite sharp but the noticeable noise is a real image killer unless these ugly distractions are eliminated.

In barely nine minutes Dumbleton demonstrates a step-by-step method for transforming this noisy mess into a portfolio-worthy final image that’s both sharp and surprisingly clean. The first thing he does is run the shot through DXO Pure Raw, a popular noise-reduction plugin that he prefers to Lightroom’s AI Denoise for reasons he explains. Pay close attention to the bird’s beak.
Dumbleton explains the best settings to use for retaining necessary detail while banishing the noise and conveys this important fact: “When you shoot at very high ISOs your image will naturally lose a lot of character and sharpness,” unless you address this challenge by following the Lightroom workflow that Dumbleton explains next.
He first refines composition with a quick, thoughtful crop that give his subject a bit more space on the right side and bottom of the frame. He chooses the Adobe Standard profile and analyzes the photo from a local, not global perspective, meaning that his plan is to independently target different portions of the shot and enhance them as needed through the use of simple masks.

Once the tones are accurately balanced and the bird is clearly isolated he slightly boots Exposure, modifies Contrast, and applies a Radial Gradient to slightly drop highlights on the brightest part of the bird. He also tweaks color, vibrance, and saturation to create a cooler look while adding a bit of magenta to fix an overall green cast.
Dumbleton makes a few more important enhancements in the final minutes of the video to complete his impressive transformation. Once you’re done watching head over to his popular YouTube channel where there are many more how-to videos to be found.
And don’t miss the eye-opening tutorial we featured recently with another image-editing expert who takes a deep dive into the difference between RAW files and Jpeg images and recommends which file format is best for your style of photography. Prepare to be surprised.
Is there really such thing as a truly “bad photo?” Most of us who are committed to evolving our skills would reply in the affirmative. But instructor Peter Forsgard insists that “bad photographs are good” because practice and a thoughtful evaluation of disappointing images have the power to unlock your creative potential.
Forsgard is a notable Finnish pro based in Helsinki whose step-by-step tutorials serves a variety of important purposes, from improving composition, keeping up-to-date on the latest imaging trends, and discovering seasonal photography tips throughout the year. This 10-minute episode will inspire you to revisit your photos that missed the mark and learn from the errors of your ways.
Here’s the essence of Forsgard’s interesting perspective: “I explore the unconventional approach of finding inspiration in the unlikeliest places—our own bad photography. It’s the secret to breaking free from your creative rut and unleashing your inner artist.” So get ready to transform your previous failures into money shots that make you proud.
Forsgard insists that whether you’re a novice or more experienced shooter this video will challenge your perception of what makes a good photo, encourage you to embrace imperfection, and think outside the box. He begins by sharing how he defines a bad image: “I mean those photos you capture before you actually get a keeper and between other successful shots.”
He then turns his attention to five reasons why these so-called failures are actually super important for accelerating your growth. Forsgard’s first point involves the concept of “muscle memory,” a term we often hear with regard to athletes. You’ll see how this notion is equally applicable to photographers as you experiment with different camera settings and unfamiliar techniques.
Forsgard explains that just as an athlete needs to rebuild confidence after being sidelined with an injury, so do photographers after a period of inactivity or a few failed photos. In other words, every image you make, good or bad, has the restorative value of speeding up your reflexes, choosing the best settings, and quickly finding pleasing compositions.
The bottom line is that repeated practice and time spent evaluating your work will not only improve your observation skills, but enhance your photographic vision, prepare you for unexpected conditions, and help significantly boost your batting average.
So remain calm, not dismayed, whenever you screw up, because better days are on the horizon. There’s more inspirational advice to be found on Forsgard’s popular and informative YouTube channel.
And speaking of teaching old dogs new tricks, be sure to watch an earlier tutorial we featured with another notable pro who demonstrates how to use Adobe’s Amazing new AI-based Adaptive Color Profile to simplify the editing process for better images with a single click.
Today’s tutorial from nature photographer Jan Wegener falls into the category of “I wished I had known about all this sooner.” But now is better than never—especially when you can take advantages of the mistakes made early on by an accomplished pro so you don’t make them yourself.
Wegener is longtime Australia-based pro specializing in nature imagery who says, “I love helping others in their quest to capture and edit stunning bird photos and find the right gear for the job.” As always, the recommendations in this video are appropriate for just about any subjects in the field.
Our takeaway from this norm-challenging episode is pretty simple: Don’t believe everything you’ve heard in the past—at least until you spend 15 minutes hearing what Wegener has to say. It’s all about being more circumspect about common notions that may compromise the photographic process and the quality of every image you make.

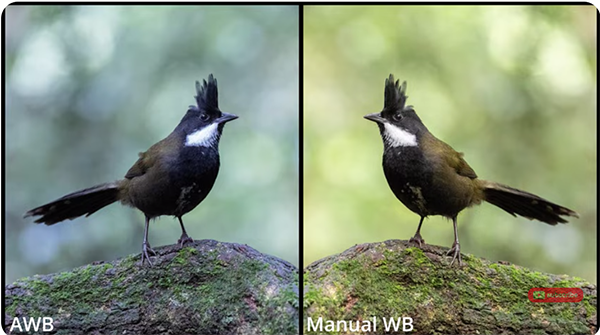
Wegener begins by demonstrating why the Auto White Balance setting can be a counterproductive choice, and why he typically turns it off on his cameras. His reason is this: “Cameras can be confused by everchanging light that is sometimes cool and other times very warm. Hence, “If we use Auto White Balance we may end up with photos that look nothing like what we saw through the viewfinder and make the editing process very difficult.”
He also explains why setting White Balance manually and shooting in Manual Exposure mode is often a great combination for achieving optimum control and photos that are easy to process. Wegener reveals that once he made the switch from always using Aperture Priority he became “a better and more conscious photographer.” And you can do the same by following his advice.
Wegener continues his assault on conventional wisdom with other myth-busting notions like “low is not the way to go,” the value of editing tweaks, and the idea that you can’t get close enough. You’ll also learn why he discounts the value of camouflage gear and other things you may do that are of questionable value.

There’s much more to learn for boosting your outdoor photography skills by exploring the many how-to videos on Wegener’s instructional YouTube channel.
And speaking of switching up your settings and techniques, don’t miss an earlier tutorial we shared from another accomplished pro who demonstrates a handful of mistakes made by inexperienced nature and wildlife photographers and how you can capture more compelling images by avoiding them from now on.
You’re no doubt familiar with a common refrain that goes something like this: “You should definitely use RAW format and never shoot Jpegs.” But is this really the best advice for you? You may be surprised by the conclusions drawn in today’s tutorial from C64 Photo Safaris—a group of Botswana-based photographers with a passion for sharing their favorite shooting and image-editing techniques.
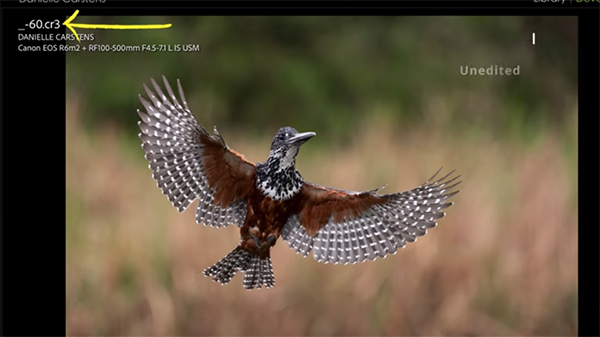
The expert advice in this helpful episode is presented in the context of photographing wildlife, but everything you’ll learn will work wonders for whatever types of outdoor images you shoot. Instructor Danielle Carstens is an experienced photographer, tour guide, and workshop leader in the African outback.
In barely nine minutes Carstens breaks down the differences between RAW files and Jpegs. She not only covers all the technical aspects but provides practical real-world examples of how the chosen file format will impact your images and post-processing workflow. You’ll learn why the decision isn’t as clear cut as you may think, and why the option you choose should be based on type of photos you shoot, and the manner in which you plan on using them.

Carstens suggests you ponder a handful of enlightening questions: “Do you intend on editing your photos or prefer them straight out of the camera? Are you shooting for social media, printing large-scale images, or entering competitions? Do you often shoot in trickly lighting conditions or high-contrast environments? Is storage space a concern for you?
Carsten explains why your answers will go a long way toward determining the best file format for your specific photography workflow. It’s important to keep in mind that this is definitely not a set-it-and-forget consideration because you can always switch back and forth between RAW files and Jpegs as the situation demands.
There are few other concepts that will help you choose, including whether you often use high ISO settings, regularly capture distant subjects with telephoto lenses, frequently deal with mixed light, and whether or not you want to create different styles when processing your work.

The C4 Photo Safaris YouTube channel is a great source of pro tips and techniques whether you shoot landscapes, travel images, or animals in the field.
And on a related note, don’t miss the recent tutorial we featured with an Australian wildlife photographer who shares several of her secrets for capturing high-key images of our feathered friends.
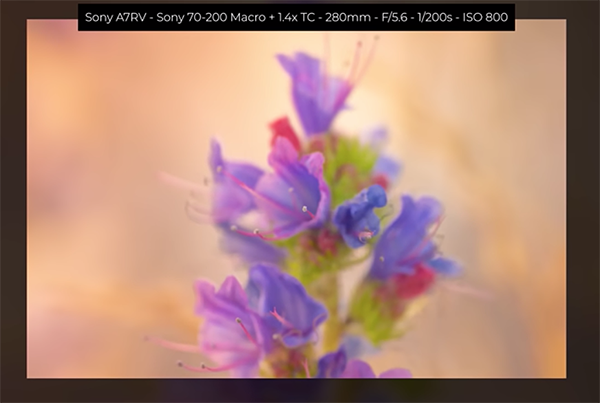
Spring is finally here, although you might not realize it if you live where there’s still snow on the ground. In other parts of the country, however, the first flowers of the season are emerging and beginning to bloom. This means that it’s time to bone up on your floral photography skills.
Instructor Albert Dros is the perfect guy for today’s tutorial and he provides 10 pro tips and techniques in the next 10 minutes. He’s a passionate landscape photographer and educator based in the Netherlands where everyone takes their flowers seriously. So pay close attention and then head outdoors and start practicing today.
This is one of those accessible genres that doesn’t require you to travel far in your search for a suitable subject. Once flowers bloom they can be found at nearby parks, a local nature center, and even along the road or in your own backyard. And you can capture these colorful blossoms with just about any gear you own.

Dros discusses the importance of camera angles, perspective, and the vantage point from which you shoot. He puts it like this, “I’ve said it before and I’ll say it again: get down low and don’t shoot from eye level.” He explains that you won’t achieve effective subject separation by shooting from above. If your camera features a flip screen, this ground level perspective is super easy to employ.
Another tip involves taking advantage of the light by positioning yourself correctly relative to the sun so you can emphasize fine details on a flower’s petals, stem, and leaves. You’ll see how soft light, backlight, and sidelight all provide opportunities for interesting effects, so don’t hesitate to experiment when framing up a shot. The simple umbrella you use to keep dry on rainy days can also be a big help in blocking direct sunlight coming from above.
Dros also discusses his focal length preferences for this style of photography, and he provides a list of his favorite lenses in the description beneath the video. He explains that he often shoots flowers with a telephoto because a long lens enables him to control depth of field by moving further back to create a beautiful blurry background that accentuates the main subject.

At this point we’ve barely scratched the surface of everything you’ll learn for capturing beautiful flower photos that stand out from the crowd. So be sure to watch until the end and maybe jot down a few notes for future reference.
Then take a look at Dros popular YouTube channel that features a wide range of how-to videos for everyone who shoots in the great outdoors.
You may also want to watch a tutorial we featured with another experienced pro who demonstrates five of the most common mistakes made by inexperienced nature and wildlife photographers and how to avoid them.
Adobe’s new Adaptive Color Profile is an amazing AI-based tool that analyses an image and adjusts tones and colors to make them “look just right.” The experts at Adobe put it like this: “The effect is as if the AI has changed exposure, shadows, highlights, Color Mixer, Curves, and other key controls for you.”
Today’s Australian instructor Charles N. provides a step by-step tutorial on how to use the Adaptive Color Profile in Lightroom Classic and says, “it’s a great starting point in your image-editing workflow.” This technique simplifies subsequent adjustments for balancing overall brightness, lightening shadows that are too dark, and refining overly bright highlights.
Charles has more than a decade of experience teaching landscape and wildlife photography, as well as offering expert advice for mastering Lightroom and other post-processing software. In this episode he explains why the new Adaptive Profile goes far beyond one-size-fits-all, and how he employs it with different types of images.

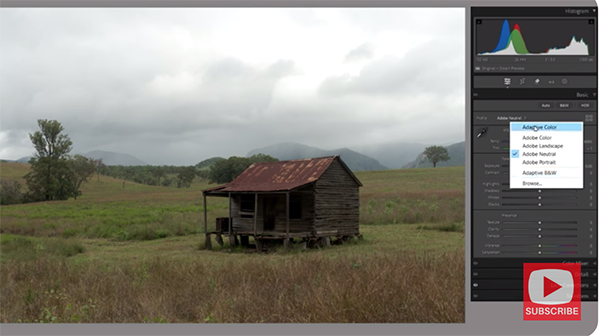
The first example is a pretty landscape image of an interesting old hut in the foreground of a scene with hills looming in the distance. Charles already edited the shot using Lightroom’s familiar Neutral Color Profile to demonstrate what happens when you sit back and watch the Adaptive Color Profile work its magic instead.
It’s important to keep in mind that this technique is only intended for use with Raw files, so don’t try it with Jpegs or TIFFs. This new tool is easy find because it appears at the top of the Profile dropdown menu. There’s a line beneath this option to indicate that it’s different than all the other profiles beneath.
Just click on your photo after choosing Adaptive Color and BOOM, the image is automatically examined and transformed in seconds. Charles then compares the version he spent 10 minutes editing to the AI-based version and they look remarkably similar. As he exclaims, “This is the beauty of the Adaptive Color profile. Sometime it gets it spot on, while other times a bit more work is necessary because nothing is perfect with AI.”

Charles continues the lesson by apply Adaptive Color to a few other landscape and wildlife photos, and the benefits are equally impressive, especially when you consider that this approach only requires a single click. So take a look and see if you agree. Then head over to Charles’ instructional YouTube channel where there’s much more to learn.
And don’t miss the earlier tutorial we featured with another post-processing expert who demonstrates when, why and how to use a straightforward time-blending technique to create landscape photographs with perfectly balanced tones.