
Fujifilm North America partnered with clinical psychologist Dr. Lauren Cook on Frame of Mind, a new survey investigating the positive impact photography can have on mental health and emotional well-being.

Fujifilm North America partnered with clinical psychologist Dr. Lauren Cook on Frame of Mind, a new survey investigating the positive impact photography can have on mental health and emotional well-being.
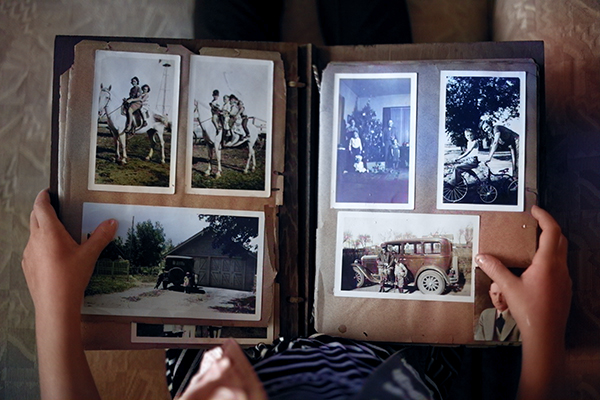
Need an emotional pick-me-up? A study commissioned by Fujifilm suggests that nearly 80% of those surveyed responded that viewing old photos brings happiness and calm emotions, with more than half experiencing reduced anxiety. Over 70% agree that taking photos increases the enjoyment of an activity.
If you’re a photographer you know that there is a nearly indescribable rush of joy that floods your brain’s pleasure receptors when you review a particularly satisfying photograph that you captured. We don’t need science to convince us that this is true—we experience it firsthand.
But it’s fascinating to confirm that this emotional response is universal across our ilk.
Fujifilm partnered with clinical psychologist and mental health expert Dr. Lauren Cook to create Frame of Mind, a survey conducted by MarketVision Research last winter among more than 2,000 US-based respondents representative of the U.S. general population. Along with other findings it reveals photos are powerful tools in promoting positive emotions, connection and resilience.
“Photos act as emotional anchors, grounding us in moments of happiness and connection,” said Dr. Cook. “What we’ve found here is that taking a few minutes a day to look through our photos or snap some pics can be a great form of self-care and bring us more joy than things we’ve turned to in the past like shopping, reading, gardening or even journaling.”

Additionally, 72% of respondents indicated they use photography as a form of self-expression and enjoy capturing and sharing their unique perspectives. 65% of respondents find comfort in photos during times of grief and 42% say revisiting old photos is a go-to strategy for cheering themselves up. Also, 8 in 10 people believe displaying photos in their living spaces contributes to greater happiness and comfort.

Conclusion
What they’re saying here in so many words, at least in my opinion, is that photographs are memories and memories make us feel good.
Artificial Intelligence, for all its power and guff, will never replace photography. It’s lacking one essential ingredient: the memory we experienced.
Photography is a safe and creative hobby that can be enjoyed by people of all ages and skill levels. For some, it’s a passion. For others of us, an obsession.
No matter where you fit on that spectrum, go out and take some pictures today. It might even make you feel better about the world.
∞ Jon Sienkiewicz
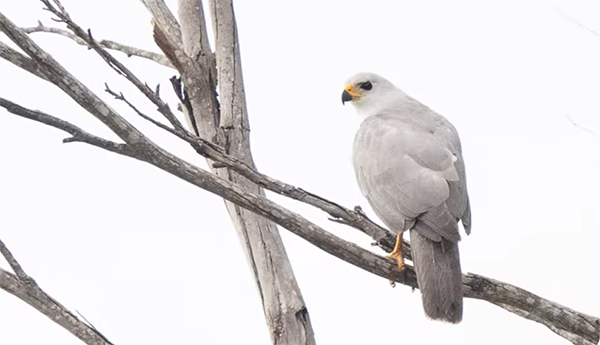
Bird photography is both fun and accessible because it’s a genre that anyone than pursue at a nearby park, wildlife refuge, or even in the comfort of their own backyard. Even newbies can get in on the action with dynamic results, as you’ll see in this quick tutorial from the popular Flying Parrot instructional YouTube channel.
Today’s Australian instructor Sonia is a commercial photographer turned wildlife chaser who refers to herself as a “bird tourist.” She’s also a very adept educator whose how-to videos are designed to share creative techniques that quickly inspire confidence in nature shooters of all skill levels.
This tutorial reveals several straightforward secrets for capturing stunning high-key images of our feathered friends. This interesting approach works its magic to produced bright images with little or no shadows for a clean, minimalist effect. It’s not only effective for wildlife imagery, but for portraiture, product photography, fashion imagery, and more.

The trick is to emphasize lighter details with intentional overexposure to minimize distractions and create photos with a dazzling effect. White backgrounds like overcast skies help get the job done by drawing attention to birds within the frame. Thoughtful composition and interesting camera angles go a long way toward fulfilling these goals with whatever equipment you own.
Sonia says she’s particularly fond of this oft-ignored technique because of the unique illustrative quality it can bring to bird photography. As she says, “it’s quite easy to create these high key images. All you need are the right conditions, a little bit of adjustments to your settings, and some straightforward post processing to finish it off.”
She explains everything you need to know in the next six minutes, beginning with the optimum conditions. You’re looking for a dull, overcast day with soft and diffused light that’s “as even and gentle as possible.” Interestingly, this is exactly the type of situation that many of us dread for most types of photography in the field. The next important element is a pale background which is typically the sky, but you can also use sand, water, or even a white building or light-colored trees.

Sona explains the camera settings she recommends for purposefully over-exposing the image in a way that blows out the sky while retaining accurate color and detail in the subject’s feathers. This can be accomplished by employing Exposure Compensation to add one-three stops depending upon the situation at hand.
She demonstrates her editing approach with Lightroom, but just about any post-processing software will work fine. You’ll learn how to eliminate noise and improve images that are still too dark for this particular effect. “The first two steps are trimming back highlights, and then increasing shadows to balance out the light.
There’s much more great advice on the Flying Parrot Photography YouTube channel, especially for inexperienced bird photographers who want to take their skills to the next level.
We also recommend watching a tutorial we featured recently with another outdoor photography expert who explains when and why you should ignore a common rule that often results in predictably uninspired landscape and nature photographs.
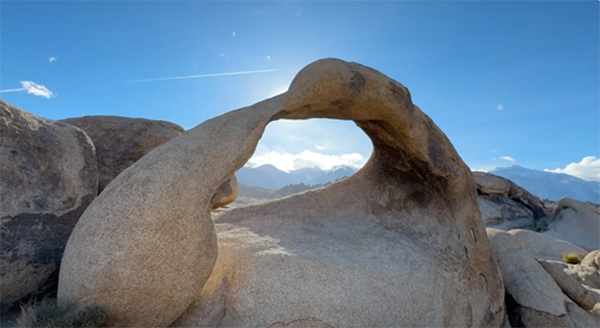
All outdoor photographers look for a creative edge that make their images stand out from the crowd, especially when shooting iconic sites that have been photographed time and time again. Today’s quick tutorial from the KPM YouTube channel demonstrates how to do exactly that by including a perfectly defined sunstar that adds drama and depth when framing up a shot.
Perhaps this technique is unfamiliar, or maybe you’ve tried it in the past and your sunstars appeared weak and unimpressive. In either case, all that’s going to change in the next four minutes. Here’s how Instructor Madhaven summarizes this episode: “I break down the art of photographing sunstars—those radiant bursts of light that can transform an ordinary scene into something extraordinary.”
Madhaven is a notable adventurer and landscape photographer whose storytelling skills play a big part in the impact of his inspirational imagery. The location for this behind-the-scenes lesson is the beautiful Alabama Hills in California’s Eastern Sierra mountains. Madhaven’s specific target is the iconic Mobius Arch at sunset where he walks you a simple step-by-step process for creating a clean and more pronounced sunstar.

If you already tried and failed it boils down to this: “Capturing a spectacular sunstar is about much more than pointing your camera and hoping for the best; rather, it’s about control. In other words,, control of camera settings, control of composition, and control over the way light interacts with a scene.” Once you understand these necessary considerations you’ll be well equipped for success.
Careful planning is also super important, and Madhaven works things out so that his arrival coincides with the sun setting inside his subject. Even more impressive is that Mount Whitney, the tallest peak in the lower 48, appears in the background above his sunstar within the arch. A great example how it’s possible to create your own luck.
Madhaven is shooting at the short end of a 24-70mm wide-angle zoom and he explains his choice like this: “the wider your focal length, the sharper and more defined a sunstar will be.” He suggests setting the camera to ISO 100 with an aperture of f/20 to minimize noise and further accentuate the sunstar.

While many photographers understand why stopping down is the best way to go, Madhaven demonstrates this less familiar trick: “If you position the sun on the edge of a solid object, whether it’s a mountain, building (or in this case the arch), the sunstar effect will be intensified.”
Madhaven provides a few more helpful in-camera tips, then he concludes the episode by explaining a “pro level” two-image blending technique that retains maximum detail in both the sun and the foreground of a scene. You can find more helpful shooting and editing advice by paying a visit to the KPM Photography YouTube channel.
Speaking of eye-catching photographs, don’t miss a recent tutorial we featured with another experienced shooter pro who demonstrates how he use backlighting to capture gorgeous landscape, nature, and wildlife photographs that are impossible to ignore.
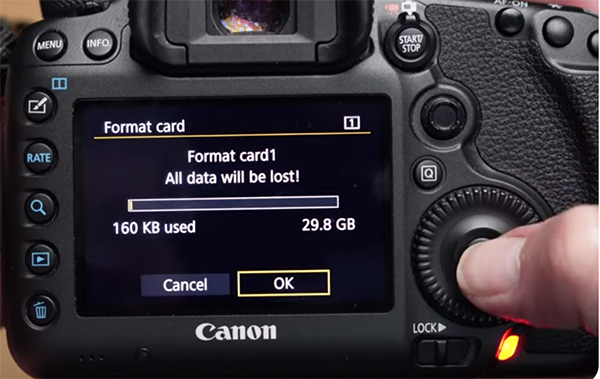
If you’ve ever unwittingly deleted photos from a memory card, the pain of losing hard-earned images is about as bad as can be. In the next four minutes you’ll learn how to void this disaster forever more by safeguarding the memory cards you use.
Instructor Anthony Crothers is British pro and a popular instructor with two decades of experience sharing practical knowledge on the latest gear, photographic techniques and technologies, and other real-world tips for elevating your shooting and post-processing skills.
Here’s how Crothers describes the goal of today’s episode: “In this short video I share with you a very simple and effective system to keep your SD cards safe and ensure that you never accidently erase precious images. I’ve been there and done that and it’s definitely not fun.’

Crothers walks you through the “foolproof” procedure he recommends for using, storing, and organizing your memory cards. He also discusses a common mistake you may have made yourself when taking the wrong approach to free up space on a card. Bottom line: This may be the most valuable four minutes you spend today.
Whenever he’s on a shoot Crothers keeps his photos on the memory card until they’ve been backed up in two separate locations, and he provides a link in the description beneath the video to an in-depth article on this topic from another like-minded pro.
After he’s completed his shoot and the images are safely backed up, Crothers formats his memory card. As he says, “this not only clears the files, but makes sure that it’s clean and ready to go for the next time.” He also illustrates a simple trick for storing cards in a case, face up or face down, so that’s it’s immediately apparent which ones still contain images that are waiting to be backed up.

Crothers also explains how to deal with cameras that feature two card slots. Another important consideration is the big difference between erasing images or reformatting the card. As he says, “if you’re only erasing them on the card, you might be making a big mistake.” That’s because data may still remain on a card even after images are deleted.
There are several additional important details to learn before the video concludes. And once it does, be sure to visit Crothers’ instructional YouTube channel where there are more helpful tips and techniques on a wide variety of imaging topics.
We also recommend watching a tutorial we featured recently with another experienced shooter who demonstrates seven “essential” in-camera techniques for avoiding an “invisible threat” that can compromise the quality of your wildlife, nature, and landscape photographs.

To paraphrase Winston Churchill, “There are too many rules of grammar up with which to put.” And the same holds true for photography rules, especially with regard to composition. Instructor Ian Worth admits that a few of these familiar notions can help frame an image, as long as you understand when they’re advisable and when they should be ignored.
Worth is a notable landscape photographer based in Wales who posts weekly “laid-back” behind-the scenes adventures that share practical tips to help others emulate his work and capture stunning in the field. The topic of today’s discussion is the validity of a concept known as “Clean Edges” or “Edge Awareness.”
According to this familiar slice of conventional wisdom you should carefully analyze the perimeter of the frame and always remove any elements that could pull attention away from the primary subject. It’s true that in certain situations this approach will improve an image by eliminating distracting clutter. But there are also times when more introspection is warranted.

Worth demonstrates why consistently adhering to this rule will challenge the originality of your work. The episode begins by illustrating why clean edges can be very effective. Then he flips the script by pulling up a few dynamic images that demonstrate five reasons when this technique may be counterproductive, and why you “may want ignore this rule altogether.”
The point is that a strict adherence to the Edge Awareness rule “can make our images feel predictable and lack a sense of creativity.” That’s why ignoring this rule, depending upon the specific scene at hand, will actually enhance the composition and impact of an image by following Worth’s advice.
Worth’s thoughtful commentary and striking imagery reveal the power of his techniques far more effectively than we can summarize them here, so pay close attention and see if you agree. Then head out in the field over the weekend and shoot several images with and without applying the composition rules discussed above. You just may be surprised by the results you’re able to achieve.

Then take a look at Worth’s instructional YouTube channel where you’ll find a wide variety of helpful tips and techniques, along with an occasional discussion about controversial issues.
And be sure to watch a tutorial we featured recently with another accomplished pro who discusses the concept of Time Blending and demonstrates when, why, and how to use it for creating outdoor photographs with perfect exposure and pleasingly balanced tones.

Do your wildlife, nature, and landscape photos appear blurry or wavy even though you used the “proper” settings and achieved precise focus? The problem may not be a faulty camera or lens, but rather what instructor Matthew Gehly calls an image-killing “invisible threat” that’s easy to avoid.
Gehly is a professional wildlife photographer whose behind-the-scenes adventures share powerful techniques that all outdoor shooters can use to avoid common problems. This quick episode describes the concept of “heat haze” (otherwise known as heat shimmer, heat refraction, or heat distortion) that can easily result in unsharp images.
In less than seven minutes you’ll learn what causes this dilemma and how to spot it. Then Gehly provides seven “essential” tip for minimizing it’s impact, so you can capture detailed photographs when the situation arises. As he says, this environmental issue “is one of the primary killers of sharp shots.”

Making matters worse is the fact that you may not be aware that this distortion is happening until your return home and closely evaluate images on the computer, at which point you’re faced with a big disappointment. Worse yet, it’s difficult, if not impossible, to make an effective fix during post processing.
Gehly explains the concept like this: “Heat haze occurs whenever there’s a differences in surface and air temperatures. This disparity creates variations in air density which in turn refracts light in unpredictable ways.” The result is an unsightly shimmery or wavy distortion effect, especially when shooting from long-distances with telephoto lenses that can magnify the problem.
In other words, when sun heats the ground it warms air directly above it. The heated air is less dense than the cooler temperatures below, and this is the root cause of your disappointing, shimmering images. Fortunately, all is not lost, at least in the future, if you understand how to predict this occurrence and follow Gehly’s seven straightforward tips for shooting in a way that quickly eliminates the threat.

Gehly illustrates these problems and solutions with clear illustrations and in-the-field photographs so you’ll understand exactly what do the next time heat haze rears its ugly head. Gehly’s popular YouTube channel is full of simple how-to videos like this one, so be sure to take a look.
And while you’re at it, don’t miss the recent tutorial we featured with another accomplished outdoor pro who demonstrates several powerful in-camera effects for capturing spectacular landscape and wildlife photographs that jump off the screen.
Time blending is one of the most powerful post-processing techniques for making sense out of complicated landscape scenes with a wide range brightness values throughout the frame. Today’s instructor Austin James Jackson explains the concept like this: “Capturing stunning wide-angle scenes can be easy when you’re willing to do a time blend,” and this is what you’ll learn how to do in the next 15 minutes.
Jackson is a notable Utah-based landscape pro who posts weekly how-to videos covering practical in-the-field techniques, gear reviews, and image-editing tutorials. Today’s 15-minute episode falls into the latter category, and Jackson’s interesting method really delivers the goods—no matter the level of your post-processing skills.
The straightforward technique involves taking multiple exposures of the same subject and blending them together to achieve a single image with spot-on exposure and perfectly balanced tones. There’s also a link in the description beneath the video for downloading Jackson’s most popular tutorial, “10 Photo Tips in 10 Minutes.”

Jackson explains why he prefers not to shoot the required three or four shots in rapid succession: “We often want to capture the light on the landscape and great clouds in the sky, but these things usually happen 10-15 minutes apart.”
A sunset scene is a great example, and Jackson’s strategic approach is to make an initial photo when the last light hits the scene. Then he leaves the camera on the tripod in the same spot and captures a second photo 15 minutes later when the clouds are absolutely fantastic. In essence, this simple two-shot blend combines the best of both worlds.
Jackson’s demonstration image is a seaside scene, so he also strives to capture a peak moment when waves are at their most dramatic. He has some very helpful tips for getting things as good as possible in the camera, with composition tips, appropriate camera settings, and other simple techniques.

The real meat of the tutorial comes next as Jackson walks you through the post-processing procedure for creating a precise, seamless blend. His approach is unique because it begins with a quick setup in Lightroom Classic, and then concludes with time blending in Photoshop.
Jackson’s popular YouTube channel is a great source of shooting and image-editing tips and techniques for everyone who ventures into the field, so pay a visit when you have time to explore.
We also recommend watching the tutorial we featured last week with another Adobe expert who demonstrates four amazing post-processing tricks for creating spectacular nature and landscape photographs that jump off the screen.

Nailing exposure can be be difficult once the the sun drops below the horizon, and one of the biggest challenges is controlling highlights for proper tonal balance throughout a low-light scene. This quick tutorial from the My Photo Journey YouTube channel describes the necessary in-camera adjustments in barely nine minutes.
The task of controlling highlights can be particularly important when shooting on the street where streetlamps, neon signs, reflections, and brightly lit windows can easily confuse the light meter in your camera. As a result, some intervention on your part is with regard to configuring the camera appropriately is an absolute must.
Today’s instructor is a British pro who goes by the handle of Dawley Lad. The subjects of this behind-the scenes episode in Lincoln include the medieval Pottergate Arch, an iconic cathedral, Bishop’s Palace, and the 14th century Exchequer Gate—all of which are bathed in some form of artificial illumination that needs to be factored into the exposure.

Dawley explains that one of the biggest hurdles when photographing structures at night is carefully managing these man-made light sources that that are common to iconic sites visited by tourists. It’s easy to get things right by following Dawley straightforward tips—otherwise the images you make will likely include blown-out highlights with insufficient detail.
Appropriate camera settings and metering techniques are absolutely essential, and Dawley demonstrates how to expose for the highlights while retaining detail in illuminated stonework. His method enables you to create a moody, atmospheric effect by also concentrating on shadows. Thoughtful composition is part of the strategy too.
Dawley is shooting with an Olympus OM-D EM1 Mark II mirrorless camera and a 45mm f/1.8 lens. The night is so cold and dreary that he had to force himself to grab his gear, bundle up, and hit the streets. We’re lucky that he did, because the result is a collection of great imagery and a bunch of helpful tips.How about taking advantage of everything you learn and trying some nighttime street photography over the coming weekend?

We also suggest paying a visit to the My Photo Journey YouTube channel where there are many more helpful how-videos to be found.
And on a related note, be sure to watch the earlier tutorial we featured with another accomplished pro who walks you through all the exposure basics for capturing detailed photographs of darker-than-normal outdoor subjects.


A sports card photographer asked Topps to adjust the crop of his image of basketball star JuJu Watkins, as it altered his artistic vision. In a big win for creatives, the company agreed and made the change.