1JM51625.png

How METERING MODES Change the Impact of Photos (VIDEO)

Are you struggling to capture perfectly exposed photos with balanced tones, deep shadows, and highlights full of detail? It a common problem that we often address in post-processing tutorials. Today, however, we’re taking a close look at how a camera’s meter-mode setting will greatly impact the look and feel of every image you shoot.

Instructor Jimmy West is an accomplished micro-four-thirds shooter whose goal for this 13-minute primer is to break down Matrix (ESP), Center-Weighted, and Spot metering, and demonstrate how each mode affects the images you capture in different ways. He also promises that learning how to meter with intention will change the way you shoot, whether the subject is a landscape, street scene, or environmental portrait—even when harsh light is the challenge at hand.

West also shares the metering mode he uses most and explains how this one, quick setting “helps me capture more consistent and creative images without relying upon post processing. Sometimes making the perfect shot isn’t about what’s in front of you, but rather how you use it.”

The bottom line is this: The mode you select helps determine how bright or dark your photo will be, and getting this wrong can lead to blown highlights, crushed shadows, or results that don’t resemble what you saw through the viewfinder. The proper choice, on the other hand will quickly solve these problems and others while enabling you to imbue images with the exact mood or effect you’re after.

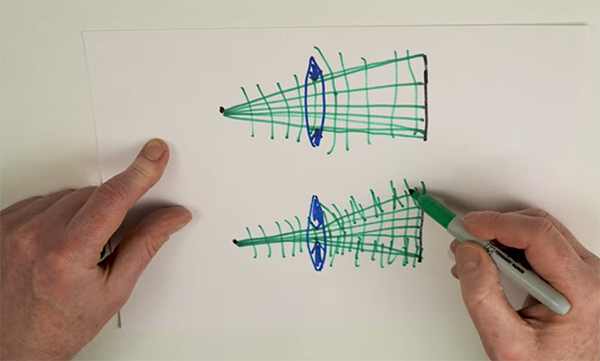
First up is the camera’s default Matrix mode (also referred to as ESP or Multi-Segment). West explains that this option “measures light across the entire frame, evaluates the scene, and attempts to find to find a balanced exposure for the image.” Most of the time this works quite well, but the camera can be tricked when there are both bright highlights and deep shadows within the frame.

This is where other oft-ignored metering modes are preferable, and West explains when, why, and how to make the right choice. As you’ll see, choosing the most-appropriate mode is definitely not a set-it-and-forget-it operation. In fact, it’s truly an essential consideration for every image you capture.

West’s popular YouTube channel is a great source of straightforward how-to videos that explain a wide variety of common photography techniques.

And on a related note, be sure to watch the tutorial we featured with another experienced educator who demonstrates how to manage high-contrast scenes properly and create balanced exposures when shooting photographs in hard-light conditions.

1G51525.png

Embrace Hard Light & Use it to Capture Epic Photos with High Contrast (VIDEO)

You’re missing out on some great opportunities if, like other photographers, you always avoid shooting in harsh middy sun. There’s no doubt that Blue Hour and Golden Hour can both be described as “prime time,” but hard light offers bold shadows and strong highlights that deliver dramatic imagery if you understand what to do.

Instructor Gil Kreslavsky is a well-respected shooter and educator who’s not shy about sharing his photography experiences, good or bad, and he begins today’s episode with an honest admission: “I used to be terrified by hard light. I could take good photos during Golden Hour or on an overcast day, but going out  in high sun, well, no way. I just didn’t know how to deal with. it.” Sound familiar?

As his skills evolved, however, Gil developed an effective method for capturing compelling high- contrast images, and that’s what you’ll learn how to do in the next 12 minutes. Then you may agree with Gil’s statement that, “I’m actually happy when it’s sunny outside because it give me the opportunity to just go out and play,” and portfolio-worthy images usually follow.

Gil says that the first important step is to understand the limitations of a camera as compared the capabilities of human vision. In short, our eyes can simultaneously discern details in both bright and dark areas in a scene (and everything in between), but even the best DSLR or mirrorless camera falls far short when it comes to its ability for recording such an expansive dynamic range.

And this is one reason that any of the images we capture in hard light may appear far less impressive on the computer than they did through the viewfinder—unless your follow Gil’s straightforward advice for embracing hard light, controlling exposure to perfection,  and capturing images with raw power.

By the time the video concludes you’ll think of harsh light as a welcome friend—not a frightening foe. Then take a close look at Gil’s informative YouTube channel where you’ll find more confidence-building tips and techniques.

We recently featured a related tutorial with another accomplished pro who demonstrates how to capture stunning outdoor photographs in any light by learning how ISO works, when to raise or lower it, and ways to avoid common image-killing mistakes.

1P51525.png

How to Create Picture-Perfect HDR Photos in Lightroom (VIDEO)

The term HDR stands for “high dynamic range” and describes a powerful method for capturing details in the lightest and darkest elements in a scene while maintaining accurate midtones. Some cameras (even compacts) offer a built-in function that captures multiple images of the same scene at slightly different exposures and automatically combines them into one balanced shot.

Today’s tutorial from the PHLEARN YouTube channel takes a different approach by demonstrating a Lightroom technique that delivers more flexibility and control so you can achieve the exact look you’re after with precision. All it takes is a better understanding of exposure control in Lightroom.

This how-to video is installment #11 of a 30-Day’s of Lightroom Series with Adobe expert Aaron Nace who introduces the lesson like this: ‘We’ll show you how to blend multiple exposures and adjust settings for balanced highlight, midtones, and shadows.” He does this with two sample Raw files that you can download with a link beneath the video so you can follow along on real time.

Nace explains that sometime a camera can’t capture all of the brightness values of a scene with one click of the shutter. As a result, maybe the sky is blown out or the shadows are crush—leaving very little detail in one or both of these areas. His HDR technique helps you overcome this barrier quickly and realistically.

There’s a preliminary step you have to take with the camera before capturing the images and opening them in Lightroom. Simply put, “you have to make sure that you a succession of photos that are underexposed, properly exposed, and overexposed.

You can do this in two ways: manually by moving some dials or automatically by choosing a menu setting for Bracketed Exposures. In the latter case you can still specify the number of exposures capture and to what degree each exposure varies in increments of one stop, a half-stop or third-stop.

The remainder of this straightfor eight-minute video is devoted to demonstrating the merging process in Lightroom, and it’s far easy that it sounds. You’ll quickly get the hang of it and want to include this process in your everyday workflow.

Once you’re done watching head over to the popular PHLEARN YouTube channel where there are almost another thousand instructional videos.

And don’t miss the tutorial we featured recently with another post-process expert who demonstrates a straightforward Lightroom workflow for creating beautiful Blue Hour photographs in minutes.

1CM51425_0.png

Want Stunning Blue Hour Photos? This Lightroom Edit is Amazing (VIDEO)

We all know that Blue Hour is one of the best times to shoot attention-grabbing images in the field. The challenge, however, is that sometimes our results fail to capture the magic and whimsy that we saw through the viewfinder as the sun dipped below the horizon.

The solution is careful, thoughtful editing that accentuates the peaceful mood of twilight when the scene is bathed in soft blue light. Today’s tutorial from the PHLOG Photography YouTube channel demonstrates a straightforward Lightroom workflow that anyone can master in the next 12 minutes.

Instructor Christian Mohrle is a notable German landscape photographer and image-editing expert based in the southern region of the country near beautiful Lake Constance. Be sure to download his sample file, from a link in the description beneath the video so you can follow along and make the changes yourself as the steps are explained.

If you’ve followed Mohrle in the past, you know that he always makes several basic, global adjustments to refine the image as much as possible before moving on to selective masking techniques. He begins by opening Lightroom’s Transform panel and fixing the skewed horizon that causes unwanted distortion to a prominent church in the middle of the frame. A bit of cropping is also required.

The next step takes place in the Basic panel where Mohrle changes the profile from Adobe Color to Adobe Landscape which significantly boosts base saturation. He then modifies highlights and shadows in a way that makes details more visible. Other preliminary adjustments include increasing Texture, Clarity, Vibrance, and Dehaze to boost sharpness, midtone contrast and introduce a bit more “pop.”

White Balance is a critical aspect when editing Blue-Hour photos, and Mohrle demonstrates how to get it just right while retaining a natural look. After few more simple adjustments you’re ready for the transformational selective enhancements to different portions of the shot.

Mohrle walks you through every step of the way from masking, final color grading and careful sharpening, to a final cleanup in Photoshop. Compare his before/after images and you’ll be duly impressed. Then head over to the PHLOG Photography YouTube channel which is a great source of tips and techniques for anyone who photographs in the field.

We also recommend watching a tutorial we featured earlier with another post-processing expert who reveals his five top picks for the best FREE online software options in 2025. No more subscriptions or downloads required!

1YP51425.png

5 Top BOUDOIR Poses: It's All About the Triangles (VIDEOS)

Thoughtful posing is a critical element in boudoir photography because our goal is to accentuate a subject’s most attractive features. The challenge is that many of us don’t have access to professional models and must rely upon inexperienced friends or loved ones instead.

It’s for this reason that is our job to provide the subject with encouragement, a bit of gentle direction, and a few sensuous poses that aren’t too difficult for inexperienced models. Today’s six-minute tutorial with long-time pro Yuliya Panchenko demonstrates “my top five boudoir poses that every single client absolutely loves.”

Yuliya is an Orlando-based photographer whose YouTube channel has almost 200K subscribers who appreciate her how-to videos and comprehensive courses on virtually every style of boudoir photography. She didn’t own much furniture when first starting out, and she struggled with her calling because she didn’t own a bed—the typical “prop” for shooting boudoir.

At some point she realized that the beauty of boudoir photography comes from posing and you don’t really need a bed to create attention-grabbing images. That’s because a bit creative posing in a chair, on the floor, or against a wall illuminated by window light, will suffice in a home “studio.”

The five poses you’ll learn today, with help from beautiful Janine, all have one thing in common: namely, arranging the body in simple, triangular shapes. We won’t bore you by attempting to describe this handful of interesting poses because the best way to learn is by watching Yuliya do her thing.

Yuliya’s instructional YouTube channel is a great place to start If you’re inspired to experiment with this unique subset of portraiture. She also shares videos on more advanced boudoir photography techniques that you’ll find extremely helpful as your skills evolve.

And speaking of eye-catching people pictures, be sure to watch the recent tutorial we featured with a post-processinf expert who demonstrates how to use Adobe’s new portrait-retouching tools in Lightroom Mobile.

1R51325.png

How the Focal Length of a Lens Relates to Angle of View (VIDEO)

Do you understand the interplay between the focal length of a lens and angle of view? It’s an important relationship to understand, and this video from a German pro will bring you up to speed in the next seven minutes.

Rainer Hoffmann is an excellent photographer who specializes in travel and landscape imagery that has appeared in numerous publications, books, calendars and the like. He’s also a very experienced educator—conducting workshops, in-person classes, and numerous online courses for over 20 years.

He introduces today’s explainer like this: “The focal length of a lens is an important parameter, however it tells us nothing about what we’re really interested in when we use a specific lens. Therefore, the angle of view is more important.” There’s also a link in the description beneath the vide for downloading a helpful chart of typical focal lengths for different sensor sizes.

Hoffmann illustrates today’s lesson with excellent graphics that make both concepts very easy to understand. Unlike with angle of view, all lenses are marked with their focal in millimeters— either on the barrel or at the front. Zooms offer a range, while prime lenses are limited to a fixed focal length and tend to be much faster.

The lesson begins with some quick physics before moving on to practical matters and Hoffmann puts it like this: “Focal length is simply the distance from the central plane of the lens to the focal point (the point where all the light rays converge).” But Hoffman says that what we really want to know is how much of a scene will appear within the frame when we use any given lens.

Hoffman demonstrates why this is where angle of view comes into play, as does the sensor size of your camera. Thus, an image made with a 50mm on a full-frame camera appears significantly different from photos shot with the same lens on an APS-C or M/43 camera.

Fortunately there’s a simple relationship between focal length and angle of view: “A short focal length means a wide angle of view while telephoto lenses have a much narrower angle of view (expressed in degrees).” And, as you’ll see, here’s when sensor size factors into the equation.

The good news is that you needn’t member all the numbers and degrees, because all this will quickly become second nature once you get the hang of it. And don’t forget to download the helpful reference chart mentioned above. Then head over to Hoffmanns popular YouTube channel where there are many more straightforward primers available.

Change These 4 Camera Settings NOW & Become a Better Photographer (VIDEO)

Wouldn’t it be great if you could dramatically improve your photos by simply changing four camera settings? This sounds like a tease but it’s actually a fact, according to professional photographer Jared Collins, who specializes in teaching less-experienced shooters how to avoid common mistakes.

Collins begins with a discussion of your camera’s Aperture Priority exposure mode. When first getting started with a DSLR he listened to the chatter and used Manual mode instead. As a result, “I spent several years turning dials and changing settings completely unnecessarily.” He then experienced a eureka moment after someone convinced him to try Aperture Priority.

He doesn’t deny that Manual mode provides maximum control in some situations, and he occasionally takes this approach himself. But if you hear him out you’ll better understand the many benefits of switching your camera’s Mode dial to AV (without any feelings of guilt).

Next on the list are your camera’s drive settings and Collins makes a prediction “I believe that you should be shooting in Burst mode more often than you did in the past.” He explains his reasoning with a question: “How many times have you been on location, thought you captured the moment perfectly, only to learn later that the subject blinked just as you pressed the shutter button?”

In other words, a high-speed burst can come in super handy if anything moves at the decisive moment, which is why Collins says he configures his camera accordingly 90% of the time. It’s better to be safe than sorry, “even if  you have to sort through more images because storage is cheap.”

As the episode progresses you’ll learn when and why Collins recommends shooting at high ISO values without taking things too far. He also explains why the Continuous AF mode can really pull you out of a jam.

So go grab your camera and experiment with configuring it differently based upon Collins advice. Then pay a visit to his instructional YouTube channel where you’ll find a variety of straightforward tricks and techniques for upping your game.

And don’t miss the explainer we featured recently with another popular instructor who demonstrates how he captures photographs with maximum depth of field by setting his lens to the “hyperfocal distance.”

1D51225.png

What is Diffraction & How it Harms Photos Shot at the Wrong F/Stop (VIDEO)

You’re in for a surprise if the important concept of “diffraction” is unfamiliar because this optical phenomenon, or spreading of light waves, has likely degraded some of the photos you captured in the past. The problem typically occurs when shooting with small apertures and image softening is the result—especially in areas of high-contrast.

The good news is that this unsightly problem will be a thing of the past after watching the video below from the My Photo Journey YouTube channel. Instructor Dawley Lad is an accomplished British outdoor photographer whose behind-the-scenes tutorials are always revealing and perhaps what you’d call transformational.

In today’s episode you’ll follow Lad strolling through Lincoln’s historic Bailgate area with a DSLR in hand as he photographs two picturesque spots, the well-known Whiskey Shop and the Wonky Shop. He poses this question for starters: “If you’ve ever wondered why your photographs aren’t sharp at very small apertures, I’ll show you exactly why this happens and how to avoid it.”

The video begins with a quick theoretical discussion of when and why diffraction becomes a potentially image-killing problem—no matter how many megapixels your camera has. In simple terms, diffraction occurs because light tends to disperse or diffract when it passed through a small opening like f/22.

Lad clearly illustrates how diffraction works by shooting multiple images of his subjects—some with his lens opened up to f/4 and others stopped all the way down to f/22. Then he returns home, opens the photos side-by-side in Lightroom, and evaluates them carefully.

As you’ll see, shooting at minimum aperture resulted in a significant loss of image quality and sharpness. Bottom Line: Don’t bend it like Beckham!

There are many more behind-the-scenes instructional videos on the My Photo Journey YouTube channel so be sure to take a look.

We recently posted another helpful primer for beginners that’s closely related to this one. So take a close look and learn how to master your camera’s ISO settings so you can capture stunning photographs in all lighting conditions.

1TW51225.png

How to Use Adobe's New Portrait Retouching in LR Mobile (VIDEO)

Adobe recently gave Lightroom Mobile a significant update with powerful features for processing portrait photographs on your phone. A couple of these enhancements can also be used to improve other types of images as well.

According to instructor Terry Lee White, “these updates are game-changers and I’m excited to walk you through the latest features.” Unlike Adobe’s new Photoshop for iPhone, the new Lightroom Mobile tricks are now available for both iOS and Android users.

White explains everything you need to know in barely five minutes, including individual retouching for multiple people in a photo, Smarter Quick Actions with zoomed-in facial editing, and collaborative photo albums with “Anyone-Can-Add” sharing.

This Lightroom Mobile update also boasts a redesigned user experience that includes QR code generation, along with a new “Add Border” tool for Samsung and other Android phones. White is a professional photographer who says, “I love using Lightroom on my phone, I do so almost daily, I’m happy when Adobe adds new things for portrait photographers, and this version does exactly that.”

White’s first example involves retouching an engaging image of two sisters shot against a plain white background with one side of a vivid red chair or sofa peaking into the left side of the frame. He begins by tapping on the Quick Actions button at the bottom of the screen that offers suggestions for the image at hand.

This Quick Actions feature was introduced a couple versions back, but here’s what’s new and extremely useful: “Instead of applying the same adjustment to everyone in a photo, you can now specify which person gets which part of the retouching.” You can still choose “all,” but if you tap on one person Lightroom Mobile zooms in on that subject’s face and identifies all of the enhancements that are available.

“So maybe only one person is smiling and showing her teeth and the other subject has her mouth closed.” The same goes for hair, eyes, and other elements that you may want to edit on one subject or the other for consistency. And making these types of changes is far easier that you would expect.

The foregoing is just one of several new capabilities that White explores, so dive right in and learn how Lightroom Mobile now makes editing and sharing photos easier and smarter than ever before. Then head over to White’s instructional YouTube channel where’s much more to learn about all kinds of photography.

And be sure not to miss a tutorial we featured with another accomplished mobile photographer recently who demonstrates how easy it is to use Adobe’s new Photoshop for iPhone to adjust and enhance mobile photographs on the go.

1AC51225.png

Master ISO to Capture Stunning Photos in Any Light (VIDEO)

Have you wondered why some of your photographs are crisp, clean, and full of detail, while others are grainy, dull, and unimpressive? The following tutorial with instructor Anthony Crothers takes an educated guess that “it’s not your camera—it’s your ISO.” And this can be super simple to fix once you understand this essential concept.

British pro Crothers has 25 years of experience with a commitment to help beginner and immediate photographers boost confidence and improve their skills. Here’s his promise for today’s eye-opening episode: “I’ll show you exactly how ISO works, when to raise or lower it, and how to avoid the most common ISO mistakes that ruin photos.” And he does all this in very simple terms over the next seven minutes.

Crothers begins with an overview of ISO and why it matters under a wide variety of situations whether you’re shooting at night, outdoors in bright sun, or struggling with dimly-lit interiors. As you see, there’s more to it than determining a correct exposure, because the setting you choose can also imbue your results with a number of creative attention-grabbing effects.

There’s also a simple ISO test you can conduct try at, along with an interesting “campfire analogy” to help you remember the details forever. Crothers illustrates his tips with real-world examples for landscapes, portraits, urban scenes, nature photos, and other images shot outdoors with varying levels of illumination.

Crothers notes that all photographers make mistakes on occasion and he reveals the most common errors to avoid so that you’re never guilty of making the mistake twice. He also relates a personal story from a wedding “I’ll never forget” and provides a bonus ISO tip at the end of the lesson to help you determine exactly how high you can go.

There’s plenty more to learn by visiting Crothers’ popular YouTube channel and perusing his many how-to shooting and editing videos.

We also recommend watching a tutorial we featured recently with a German pro who demonstrates how easy it is to employ the concept of  “hyperfocal distance” to capture sharp photographs with maximum depth of field.